DeskPi MicroCar (DP-0021)
Revision History
| Date | Version | Description |
|---|---|---|
| July 4, 2023 | V1.0 | Initial release |
Introduction
DeskPi MicroCar is a multi-functional and multi-purpose intelligent cart based on the BBC micro:bit. It integrates on-board drive motors, ultrasonic distance sensors, line tracking sensors, sound sensors, and RGB LEDs, programmed via MakeCode graphical blocks or MicroPython. It is especially suited for students and makers learning robotics, sensor interfacing, and algorithmic vehicle control step by step.
Key Features
- Designed for BBC micro:bit
- All modules are pre-wired for out-of-the-box prototyping
- 9 types of easy-to-use integrated modules
- 4× WS2812 RGB LEDs
- 0.96’’ 128×64 OLED Display
- Sound and volume detection
- 2× Optical sensors
- 2× Programmable keys
- 2× Grayscale line-tracking sensors
- Ultrasonic distance measurement
- Infrared (IR) receiver with remote control included
- 2× DC drive motors
- Powered by 3× AAA 1.5V batteries with independent power switch
- 2× Servo expansion ports
- 4× M3 structural expansion mounting holes
What’s Included
- 1 × BBC micro:bit
- 1 × DeskPi MicroCar Main Chassis
- 1 × 0.96" OLED Display
- 1 × Ultrasonic Sensor
- 1 × Infrared Remote Control
- 1 × Front Caster Wheel
- 2 × Rubber Drive Wheels
- 2 × Motor Mounting Brackets
- 10 × M3*5 Screws
- 1 × Micro USB Cable
Pinout Diagram
Assembly Instructions
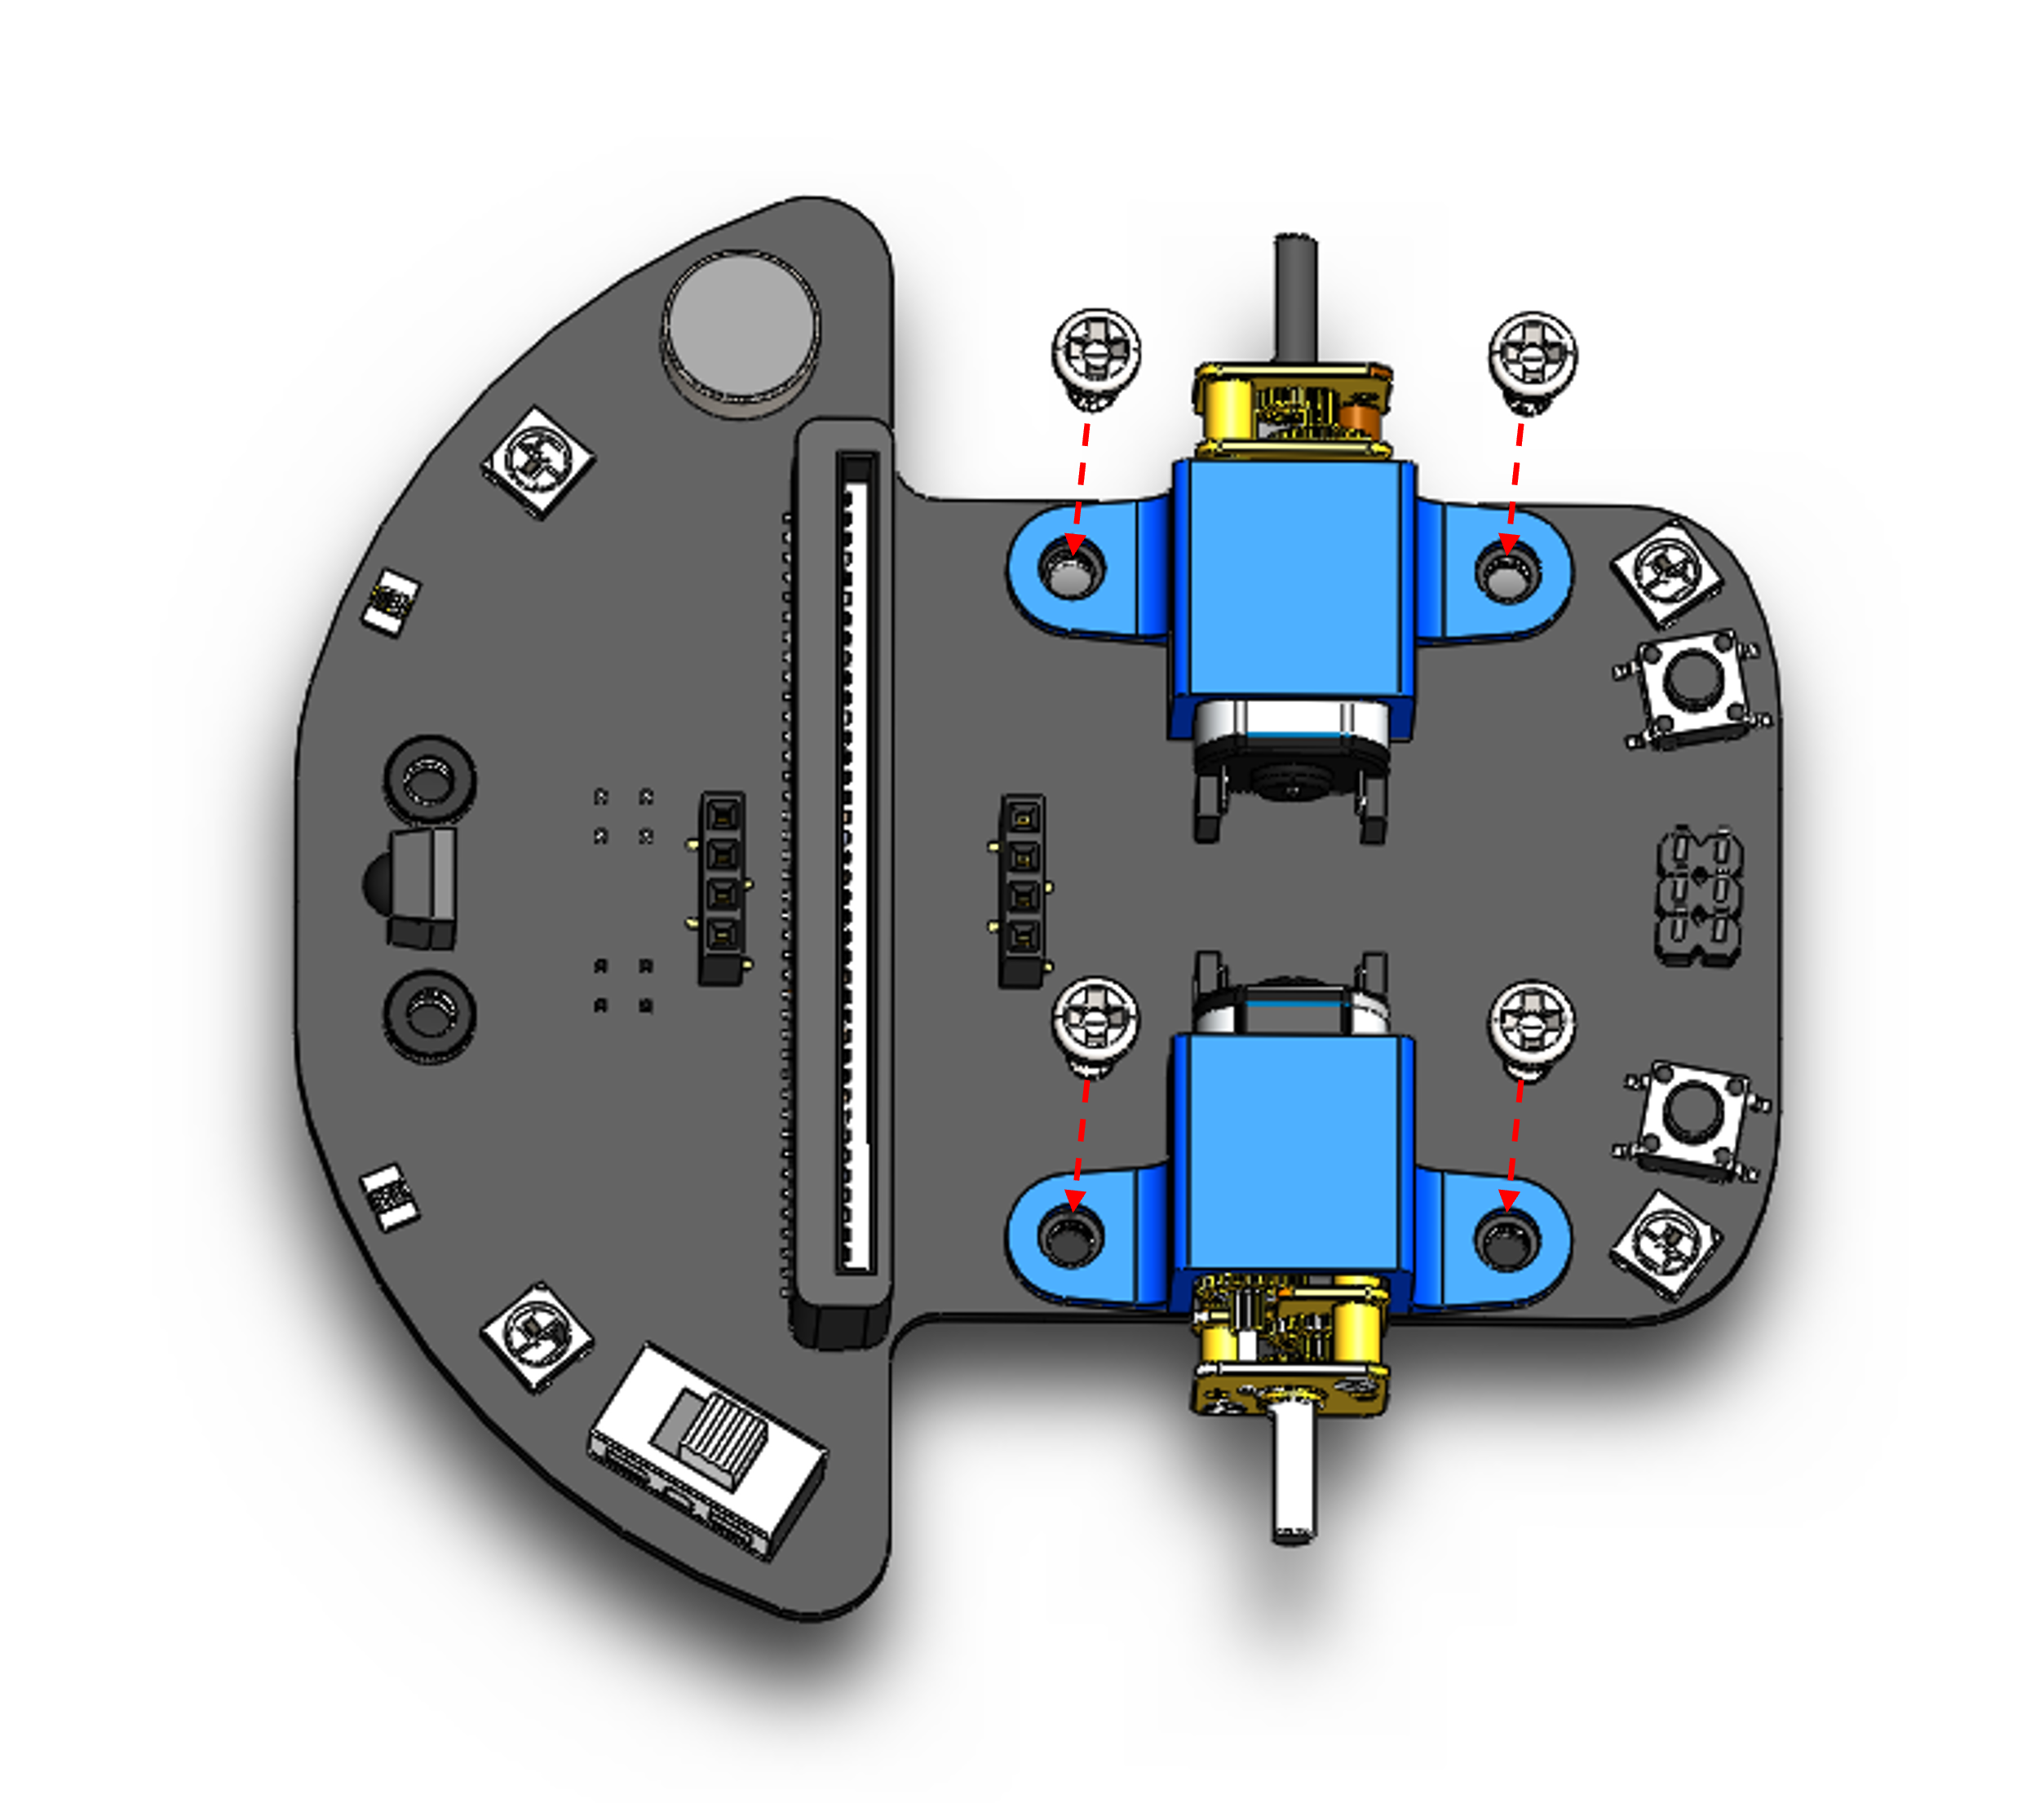
Step 1: Install Motor Mounting Brackets
Secure the two motor mounting brackets using 4 × M3*5 bolts:
Step 1: Secure motor mounting brackets with M3 screws
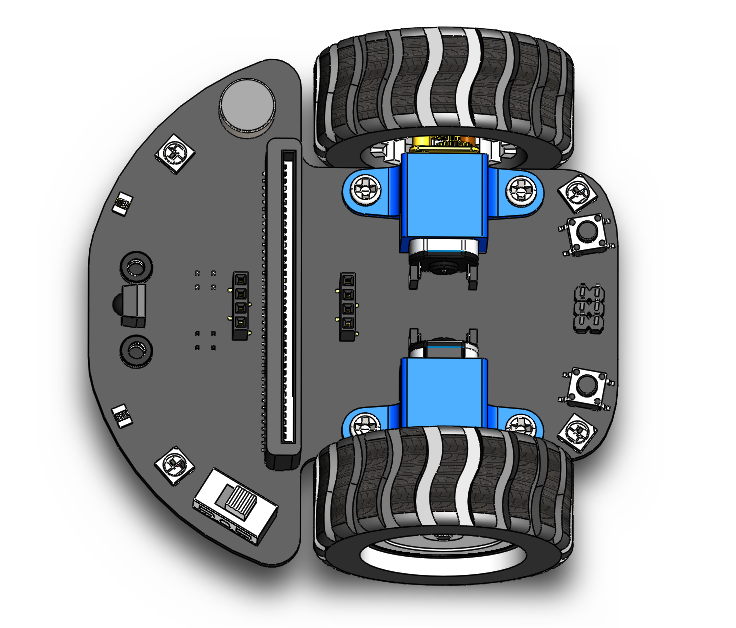
Step 2: Fix Wheels onto Axles
Press and fix the two rubber wheels securely onto the drive axles:
Step 2: Mount drive wheels onto motor axles
Step 3: Install Front Gimbal Wheel
Secure the front omni-directional gimbal wheel using 2 × M3*5 bolts:
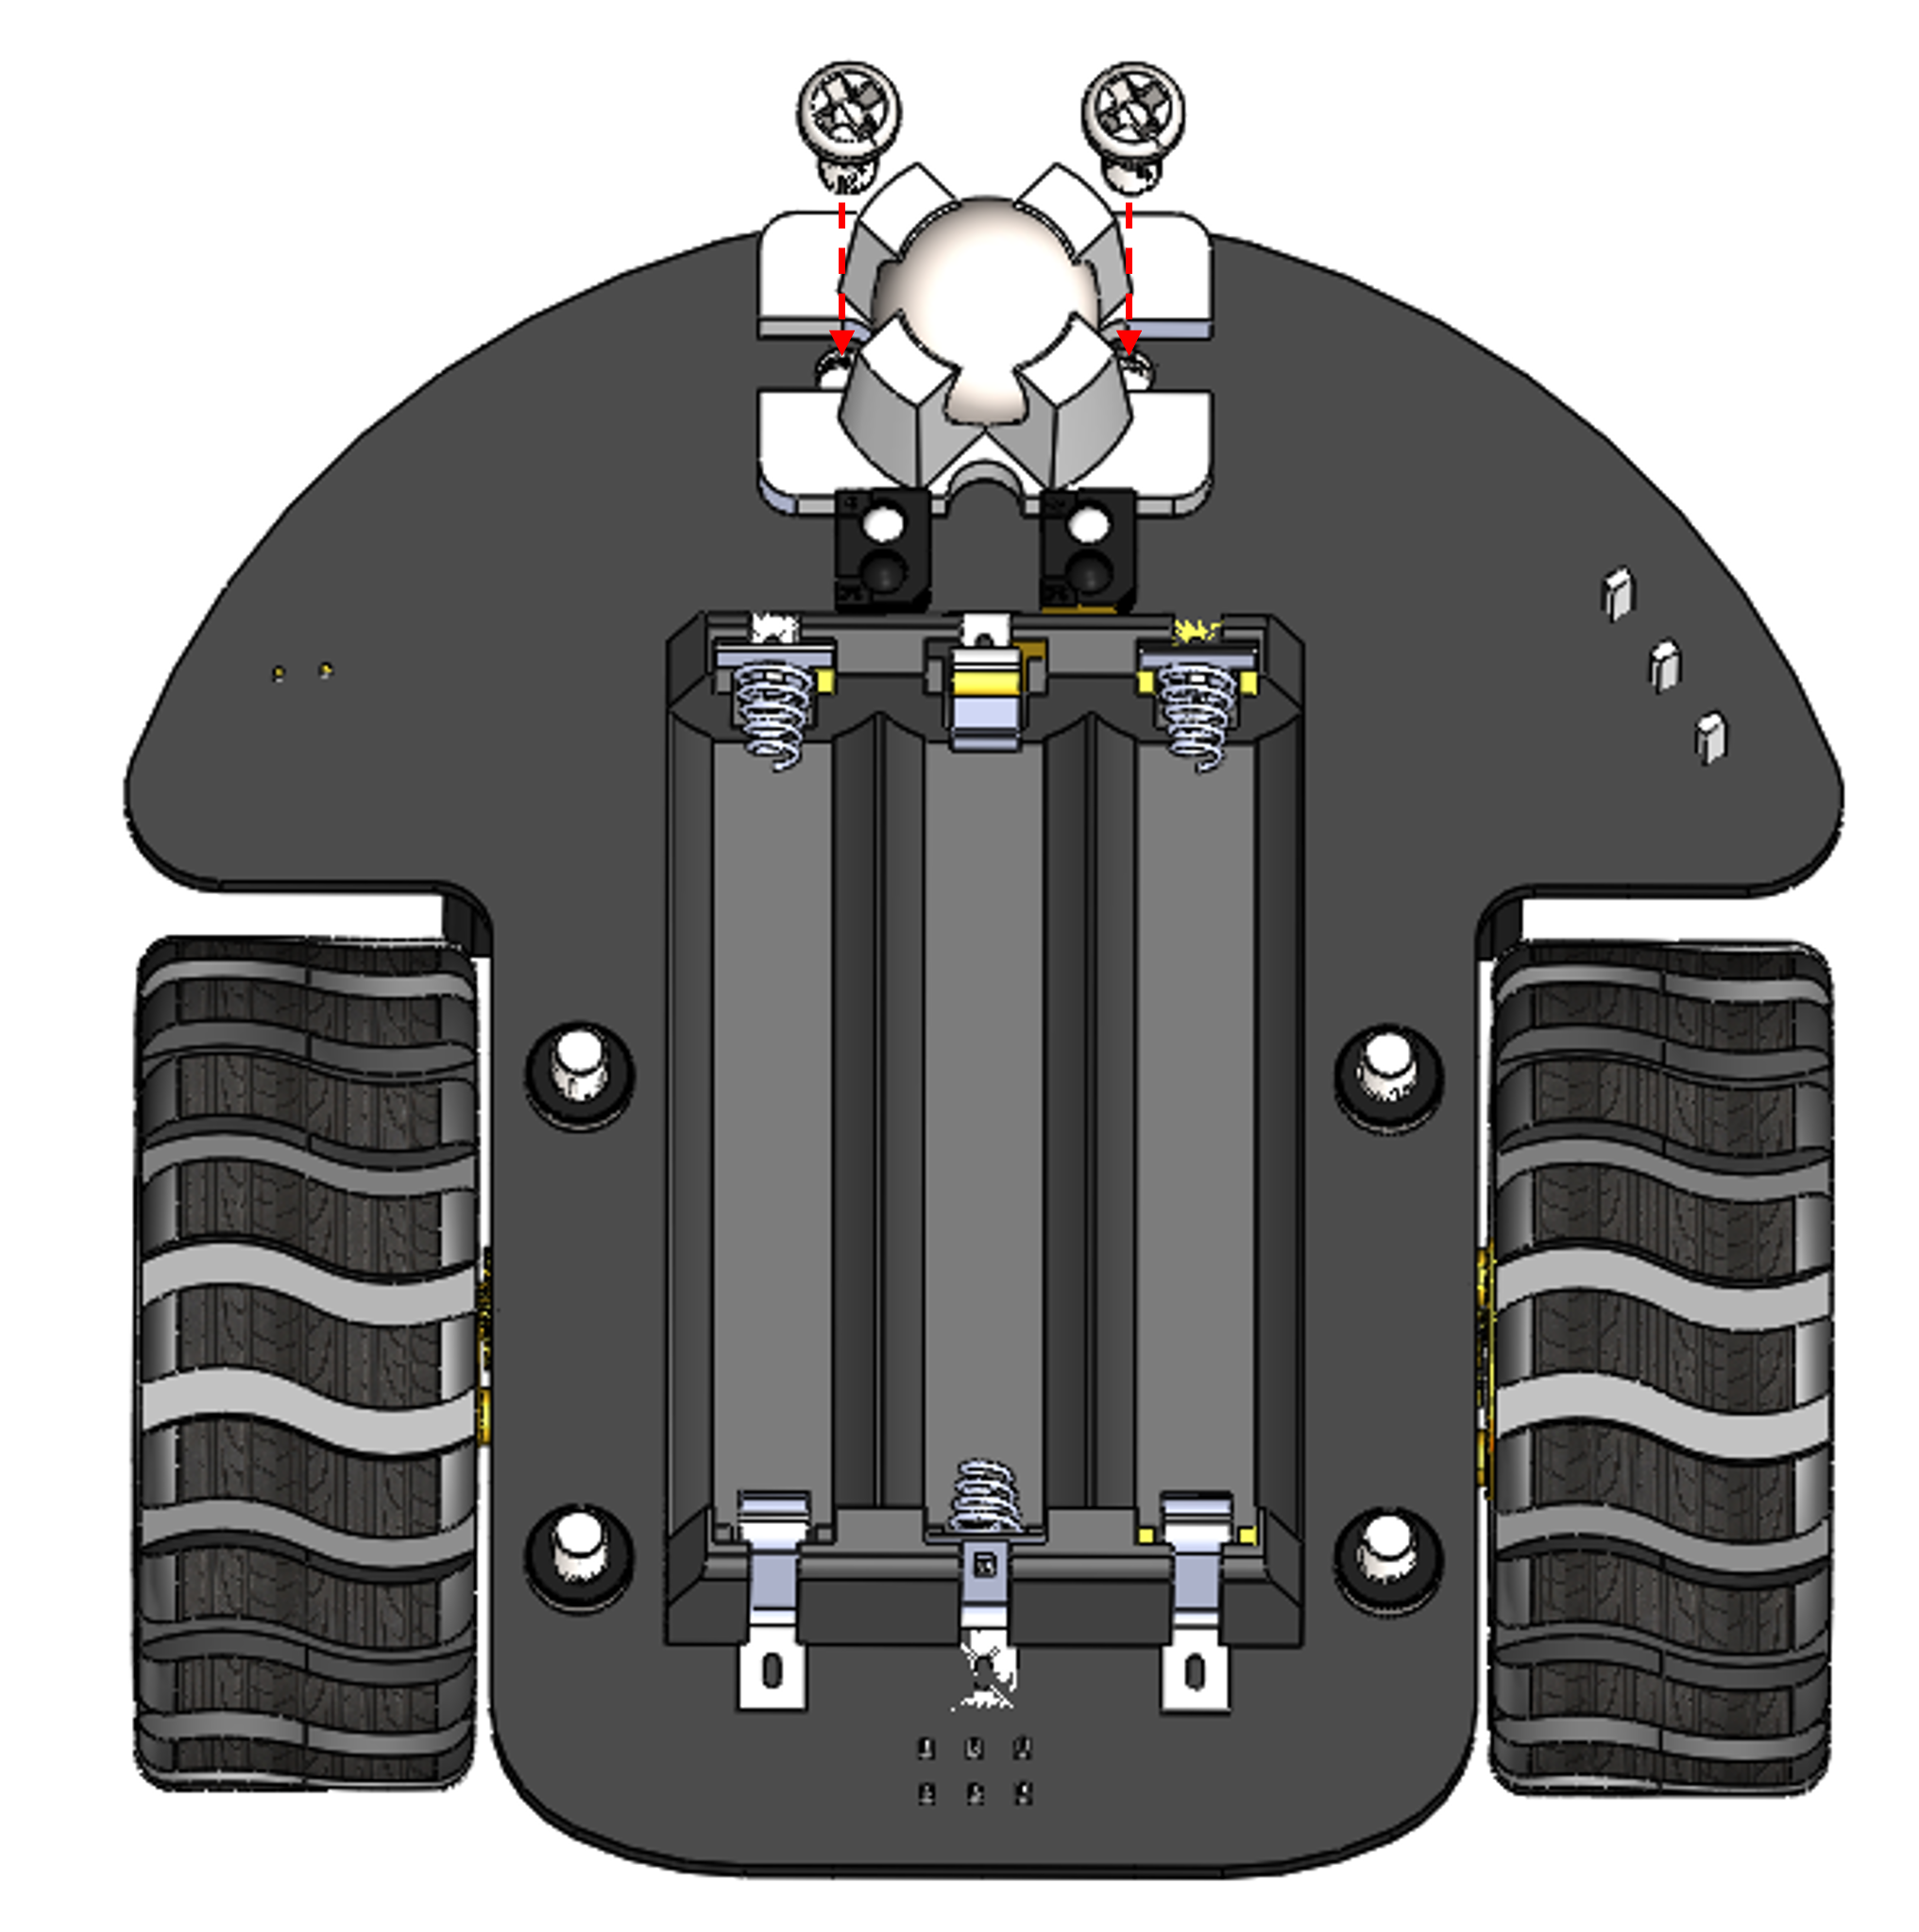
Step 3: Install front caster / gimbal wheel
Getting Started with Micro:bit and Makecode
Micro:bit is an ARM-based microcontroller designed by the BBC for STEM education. It features onboard Bluetooth, an accelerometer, an electronic compass, two programmable buttons, and a 5×5 LED matrix display.
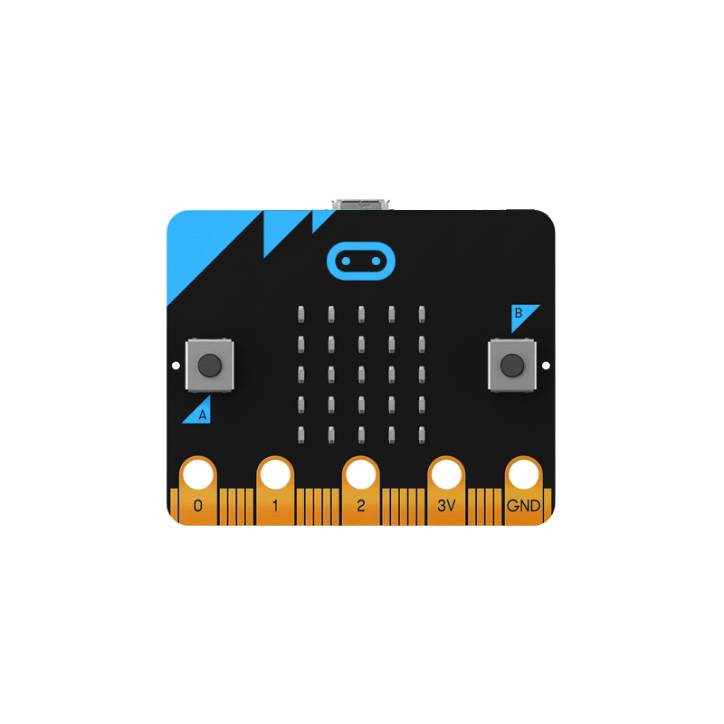
BBC micro:bit controller board
MakeCode is the official visual programming platform for micro:bit, enabling block-based drag-and-drop or Python coding:
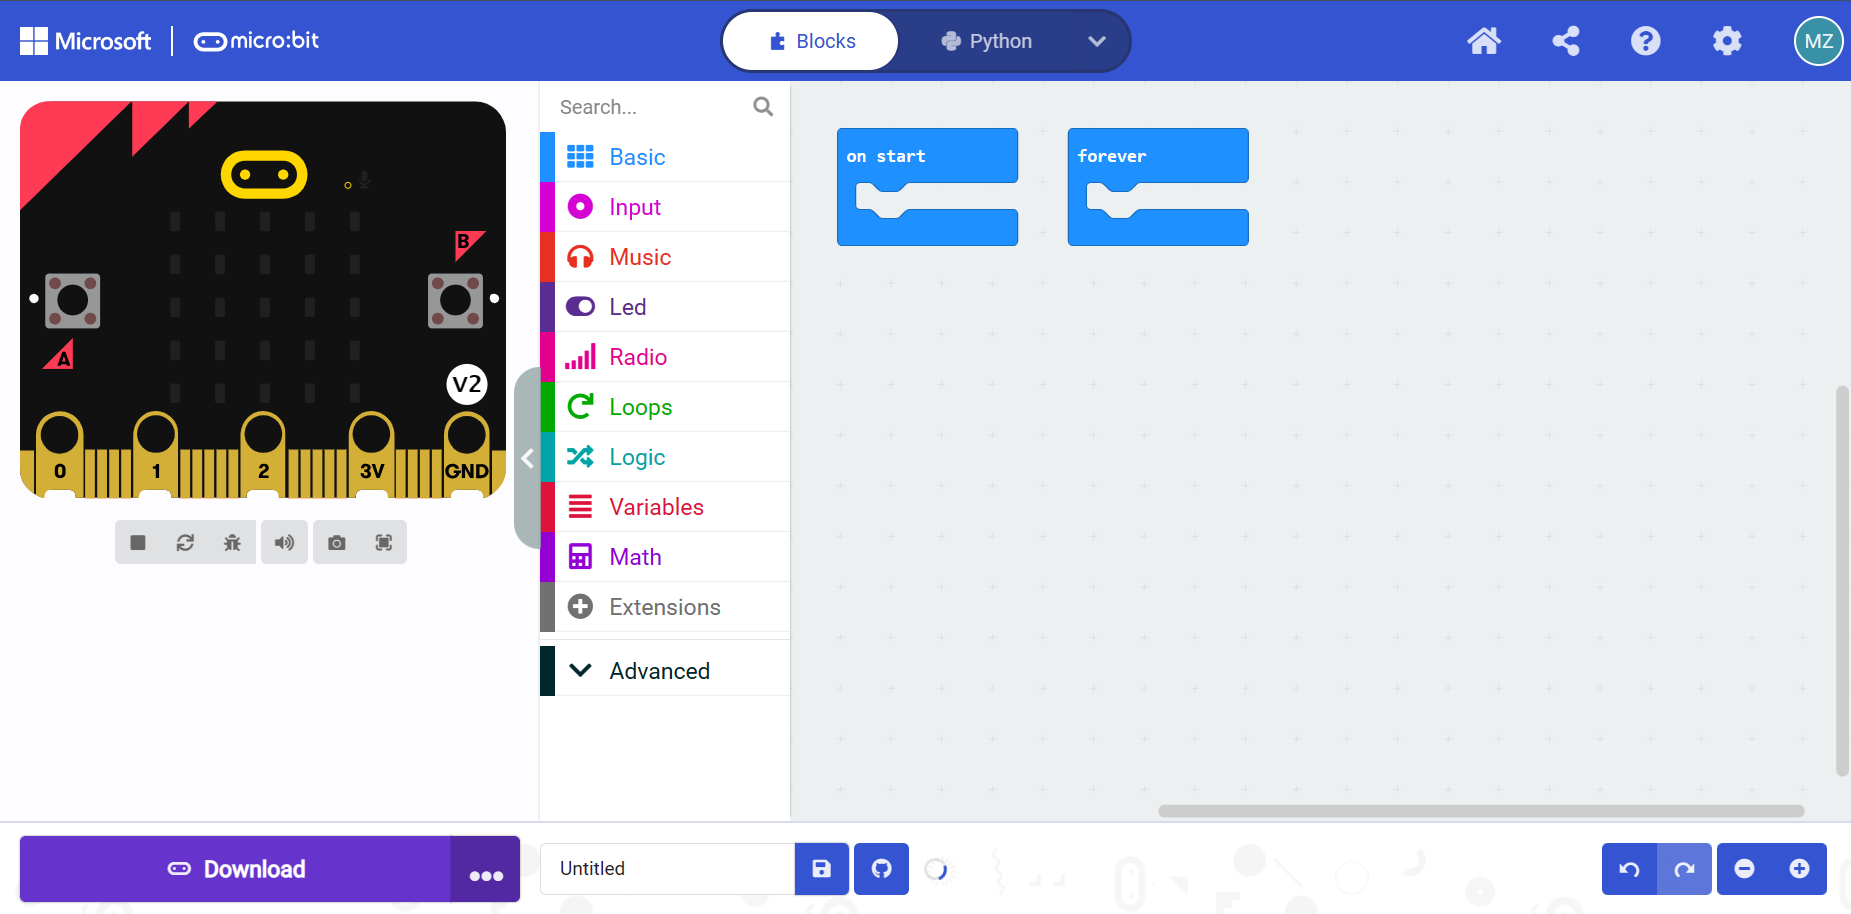
Microsoft MakeCode visual workspace
Individual Module Examples
This section contains example code routines demonstrating individual sensor and actuator modules on MicroCar.
Note: Ensure the micro:bit board is firmly inserted into the MicroCar edge-connector socket before powering on.
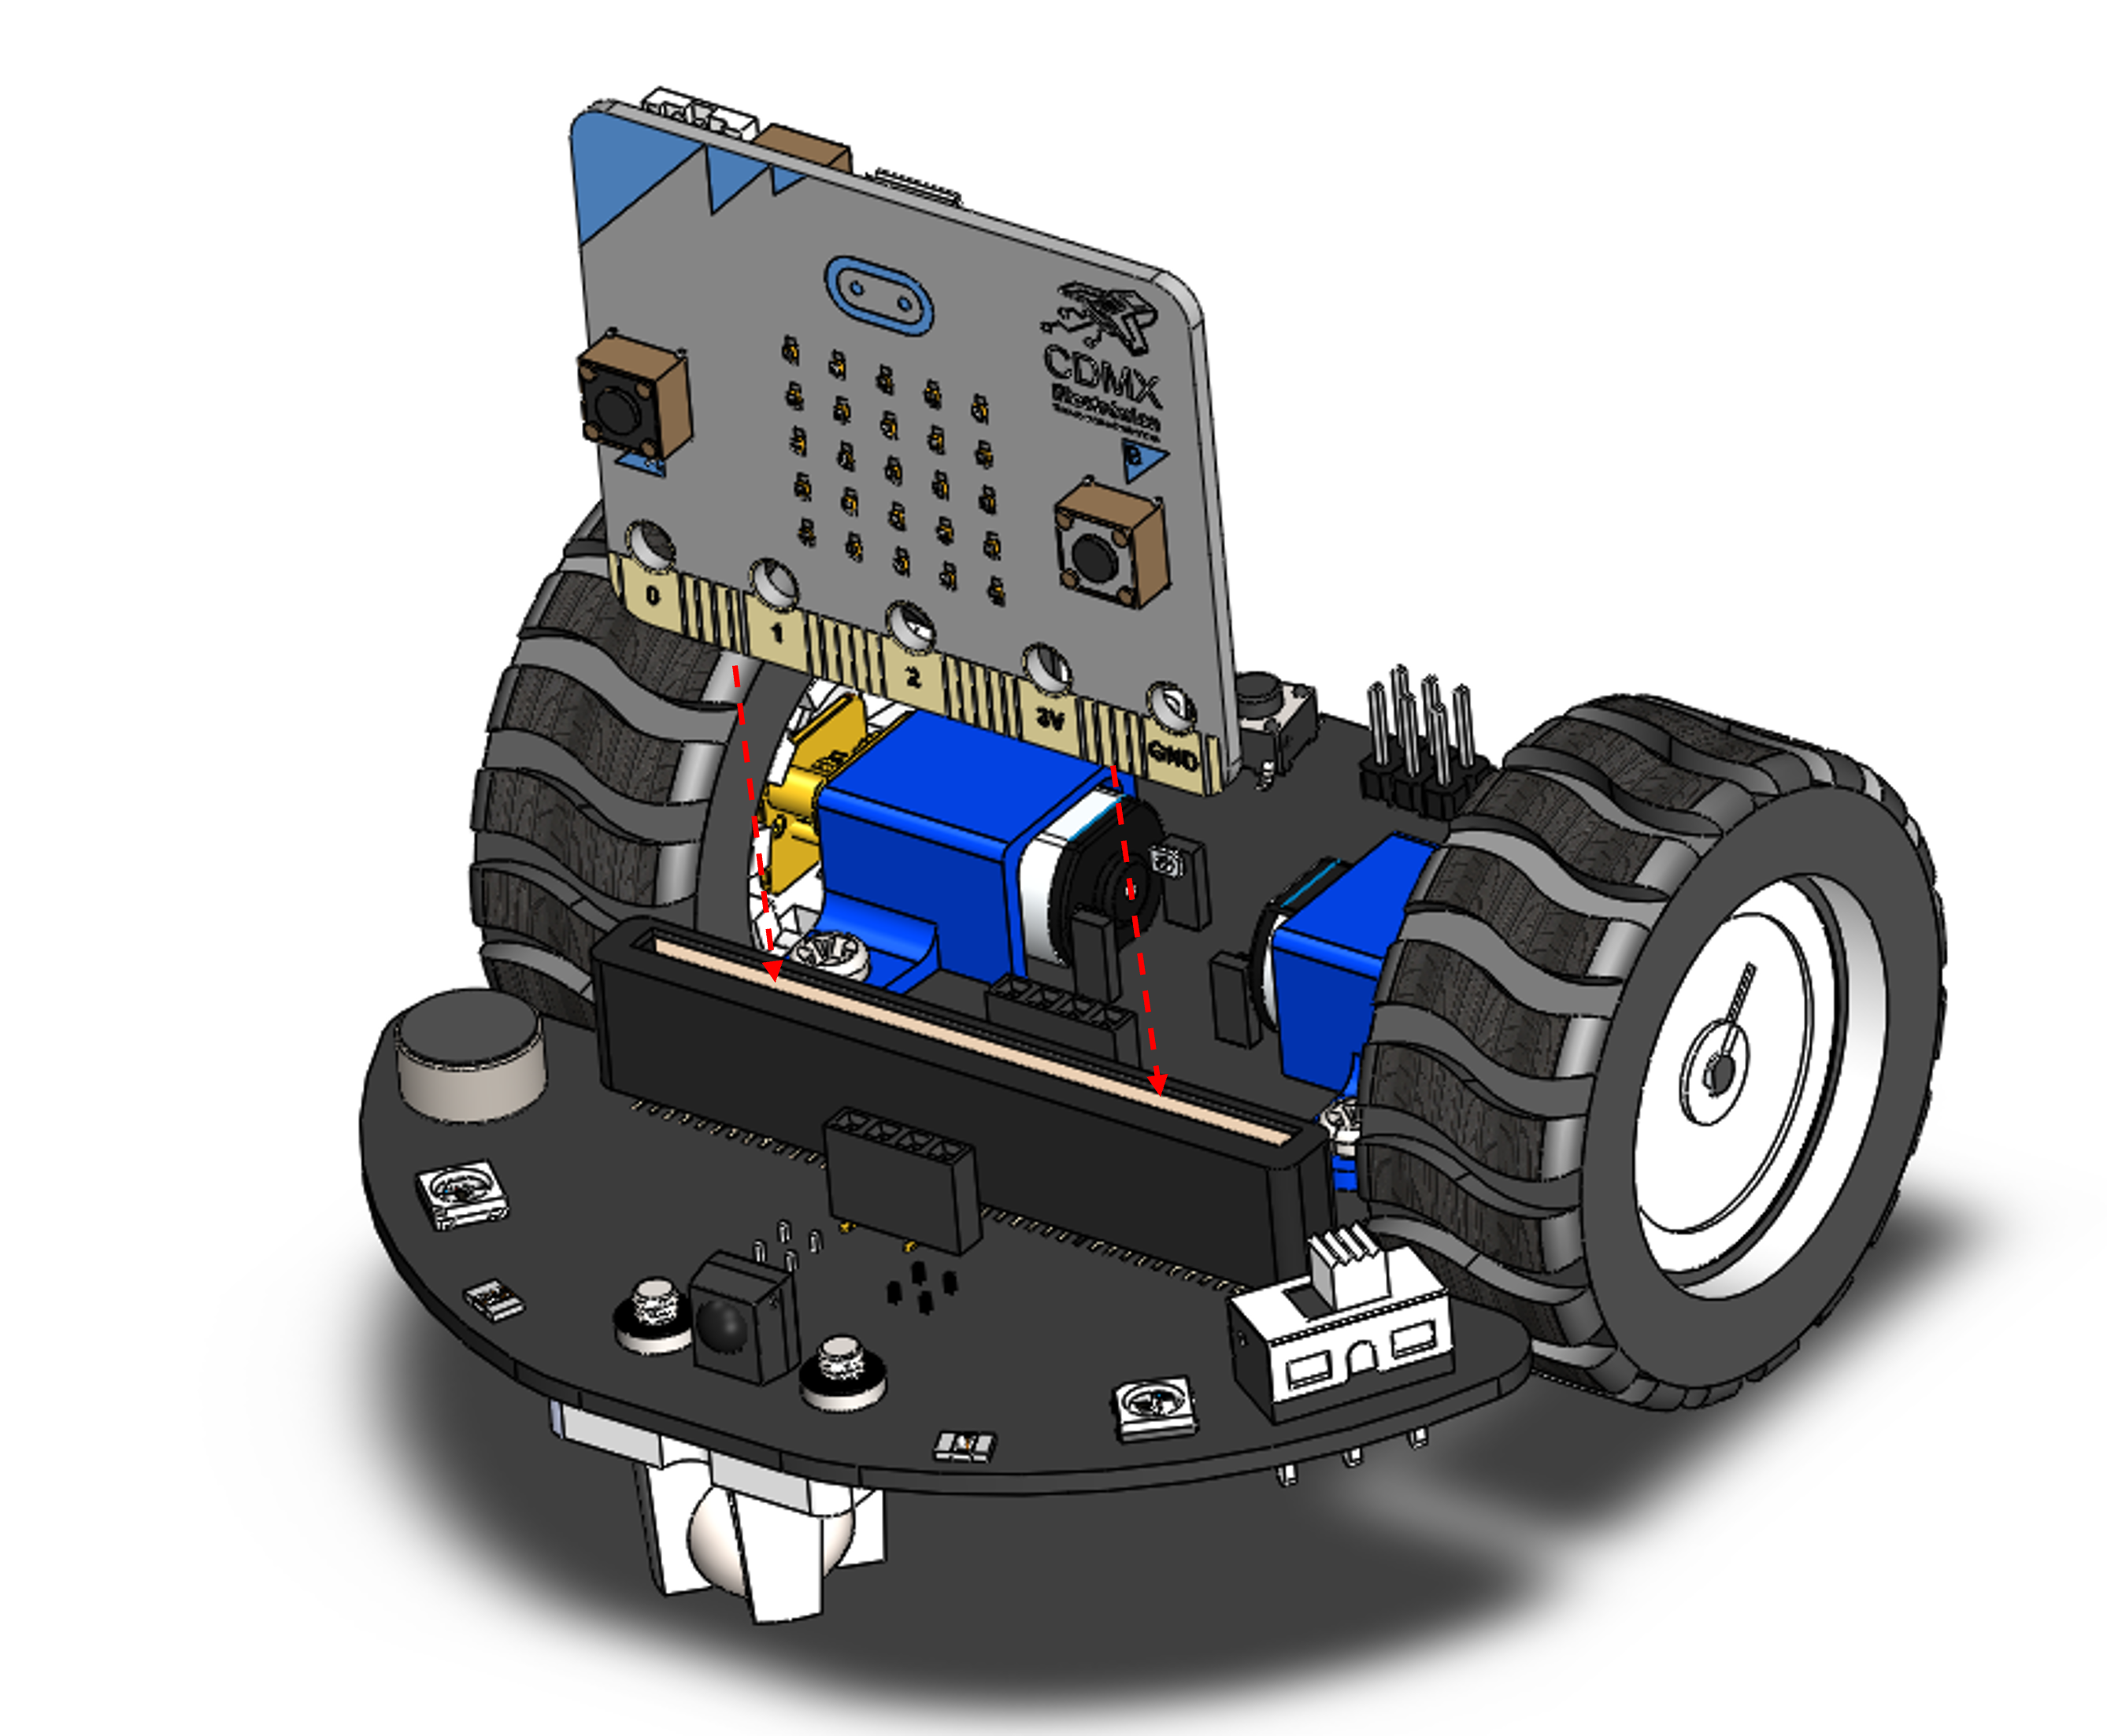
micro:bit board properly seated in carrier socket
Open the MakeCode workspace at https://makecode.microbit.org/ to begin.
Hex File and Diagram Download
Download the demo packages and wiring diagrams:
Or explore the open-source repository: DeskPi-Team/microcar on GitHub
RGB LEDs
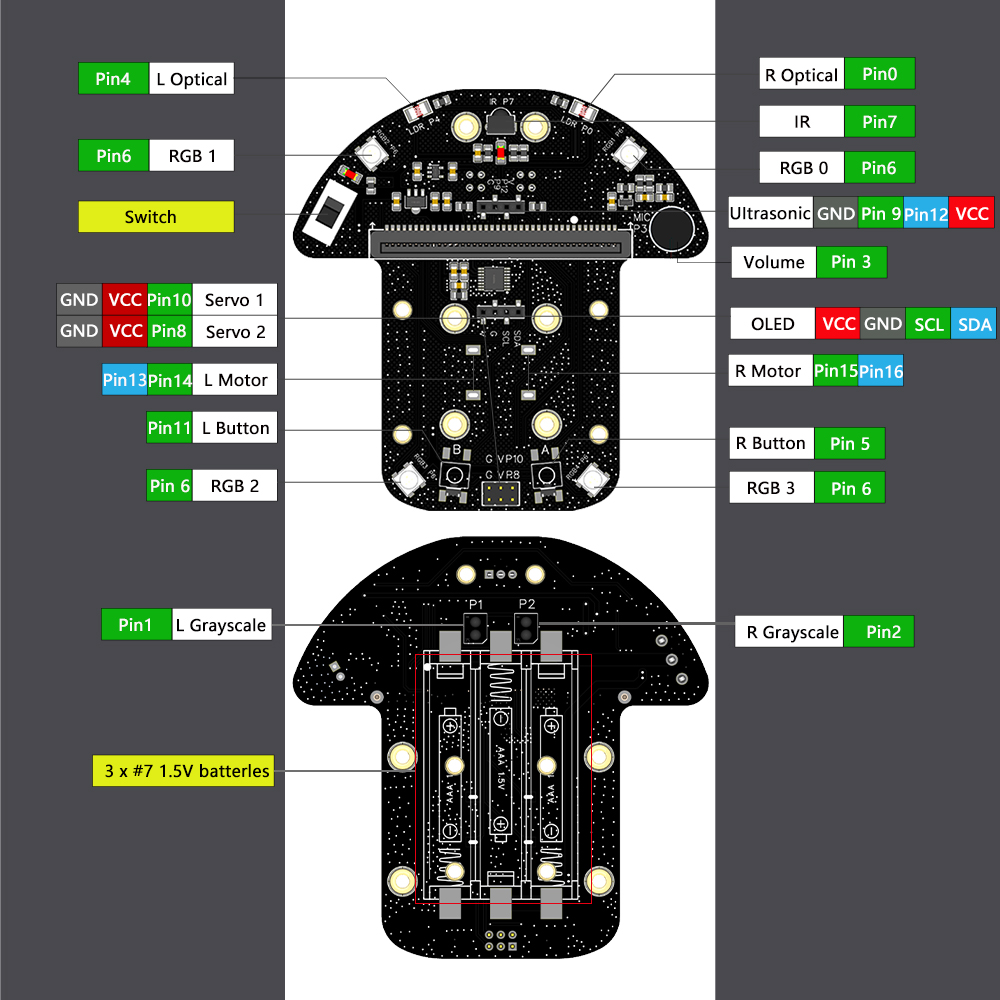
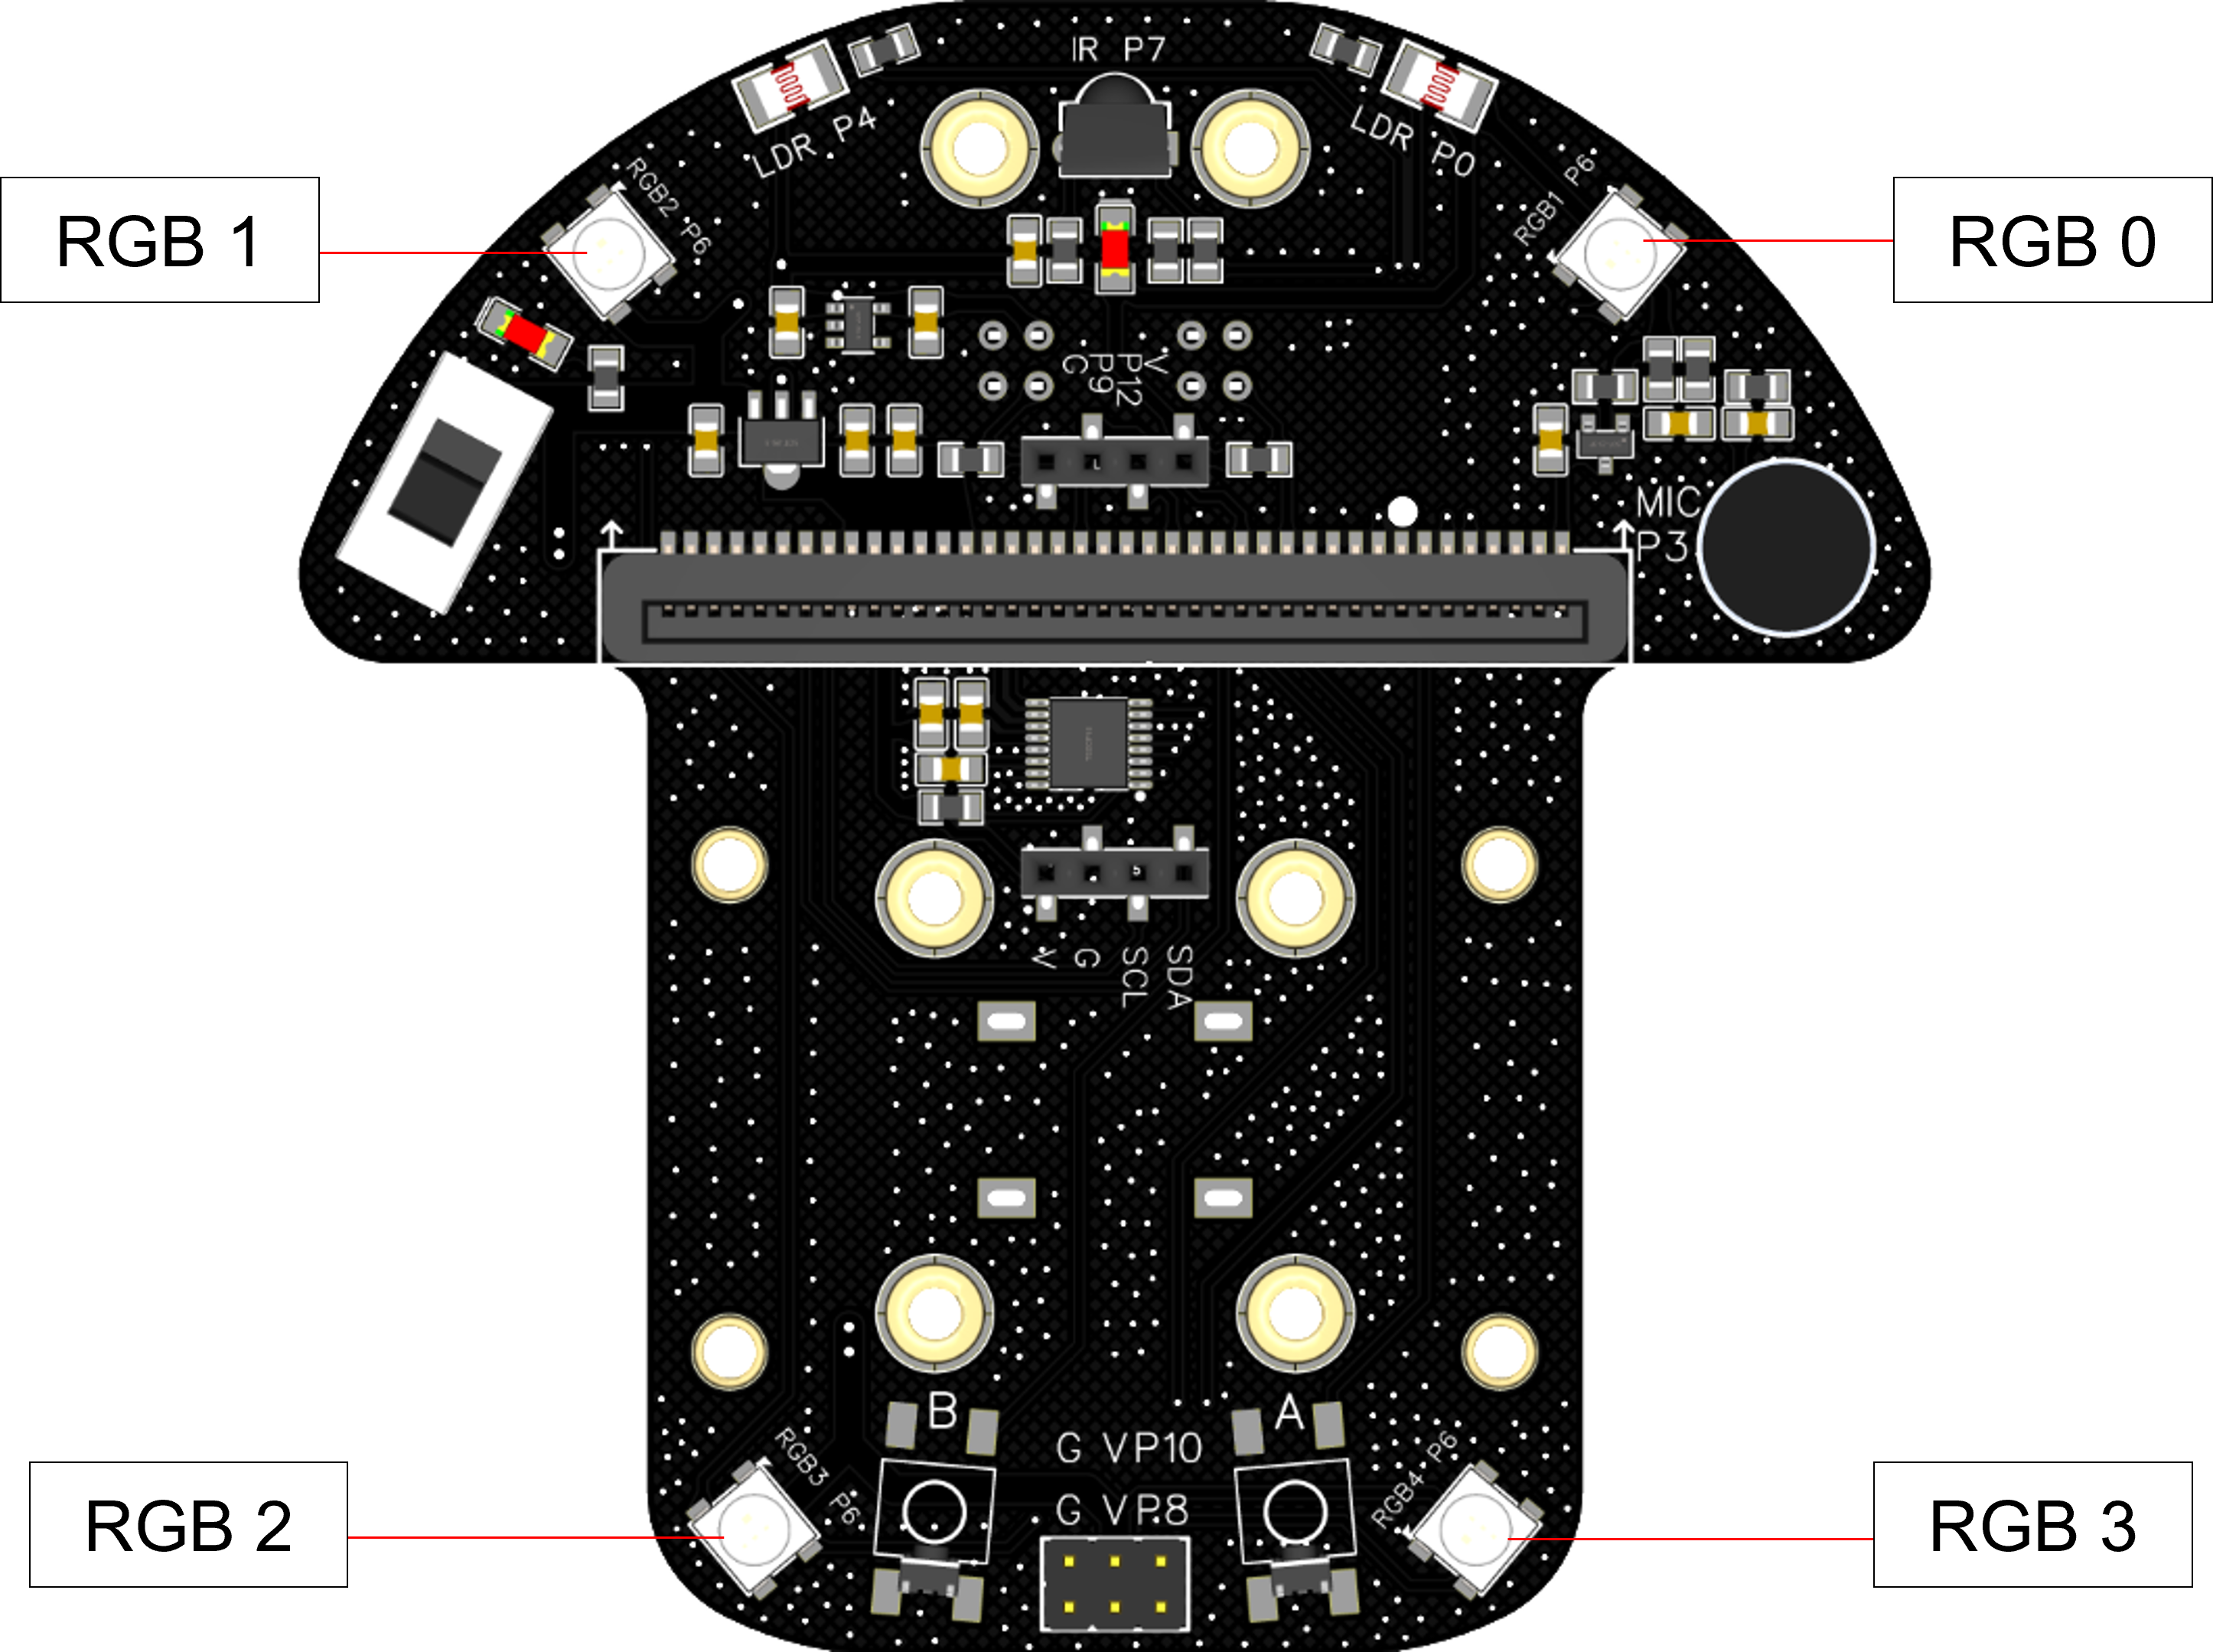
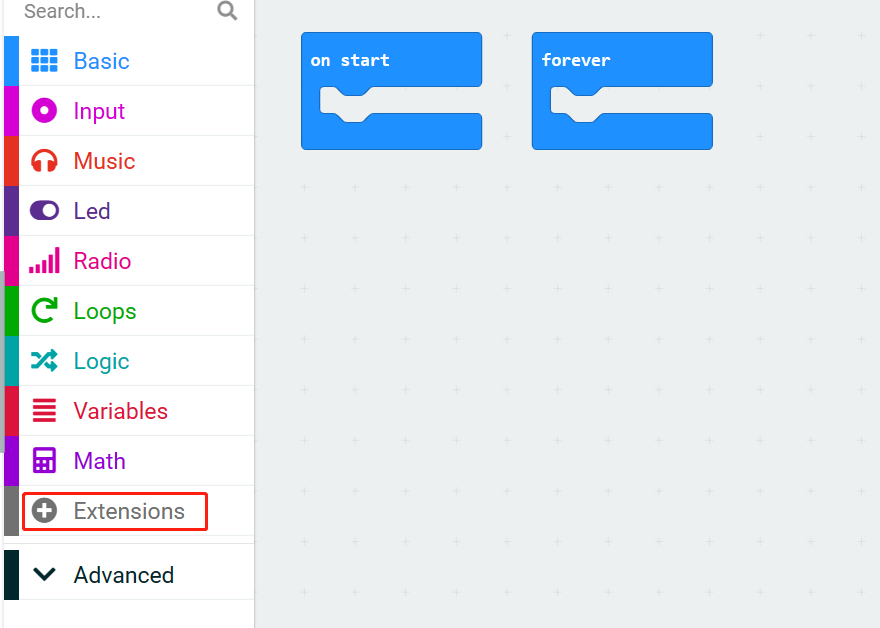
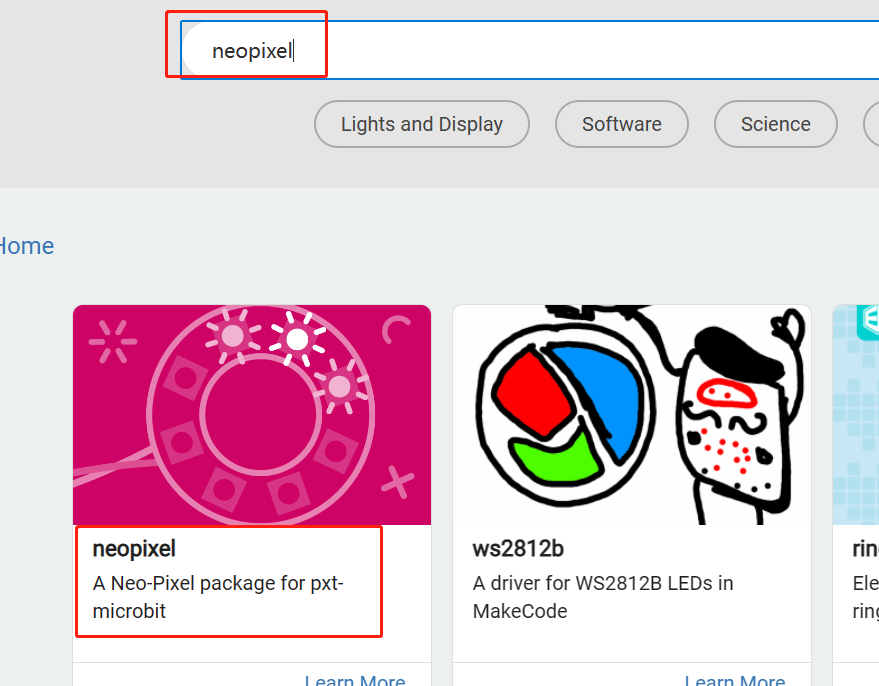
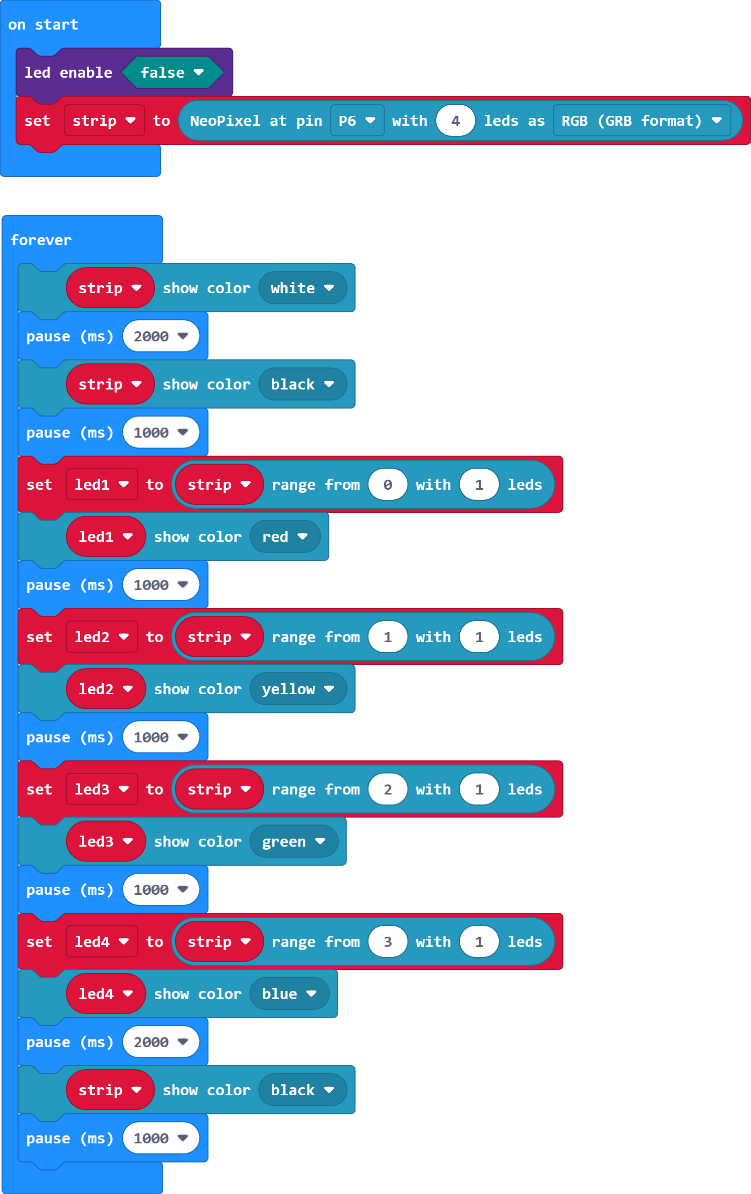
DeskPi MicroCar has four WS2812 RGB LEDs pre-wired to Pin6 on the micro:bit. In the MakeCode Extensions panel, search for neopixel and add the NeoPixel package.
Load the code block below to program custom LED lighting patterns.
Note: Ensure
led enableis set tofalsewhen running RGB functions.
Connect the micro:bit to your computer via USB cable. In MakeCode, click Download to flash the code.
Connection Note: If automatic USB pairing fails, click the settings menu icon in MakeCode and select Connect Device.

OLED Display
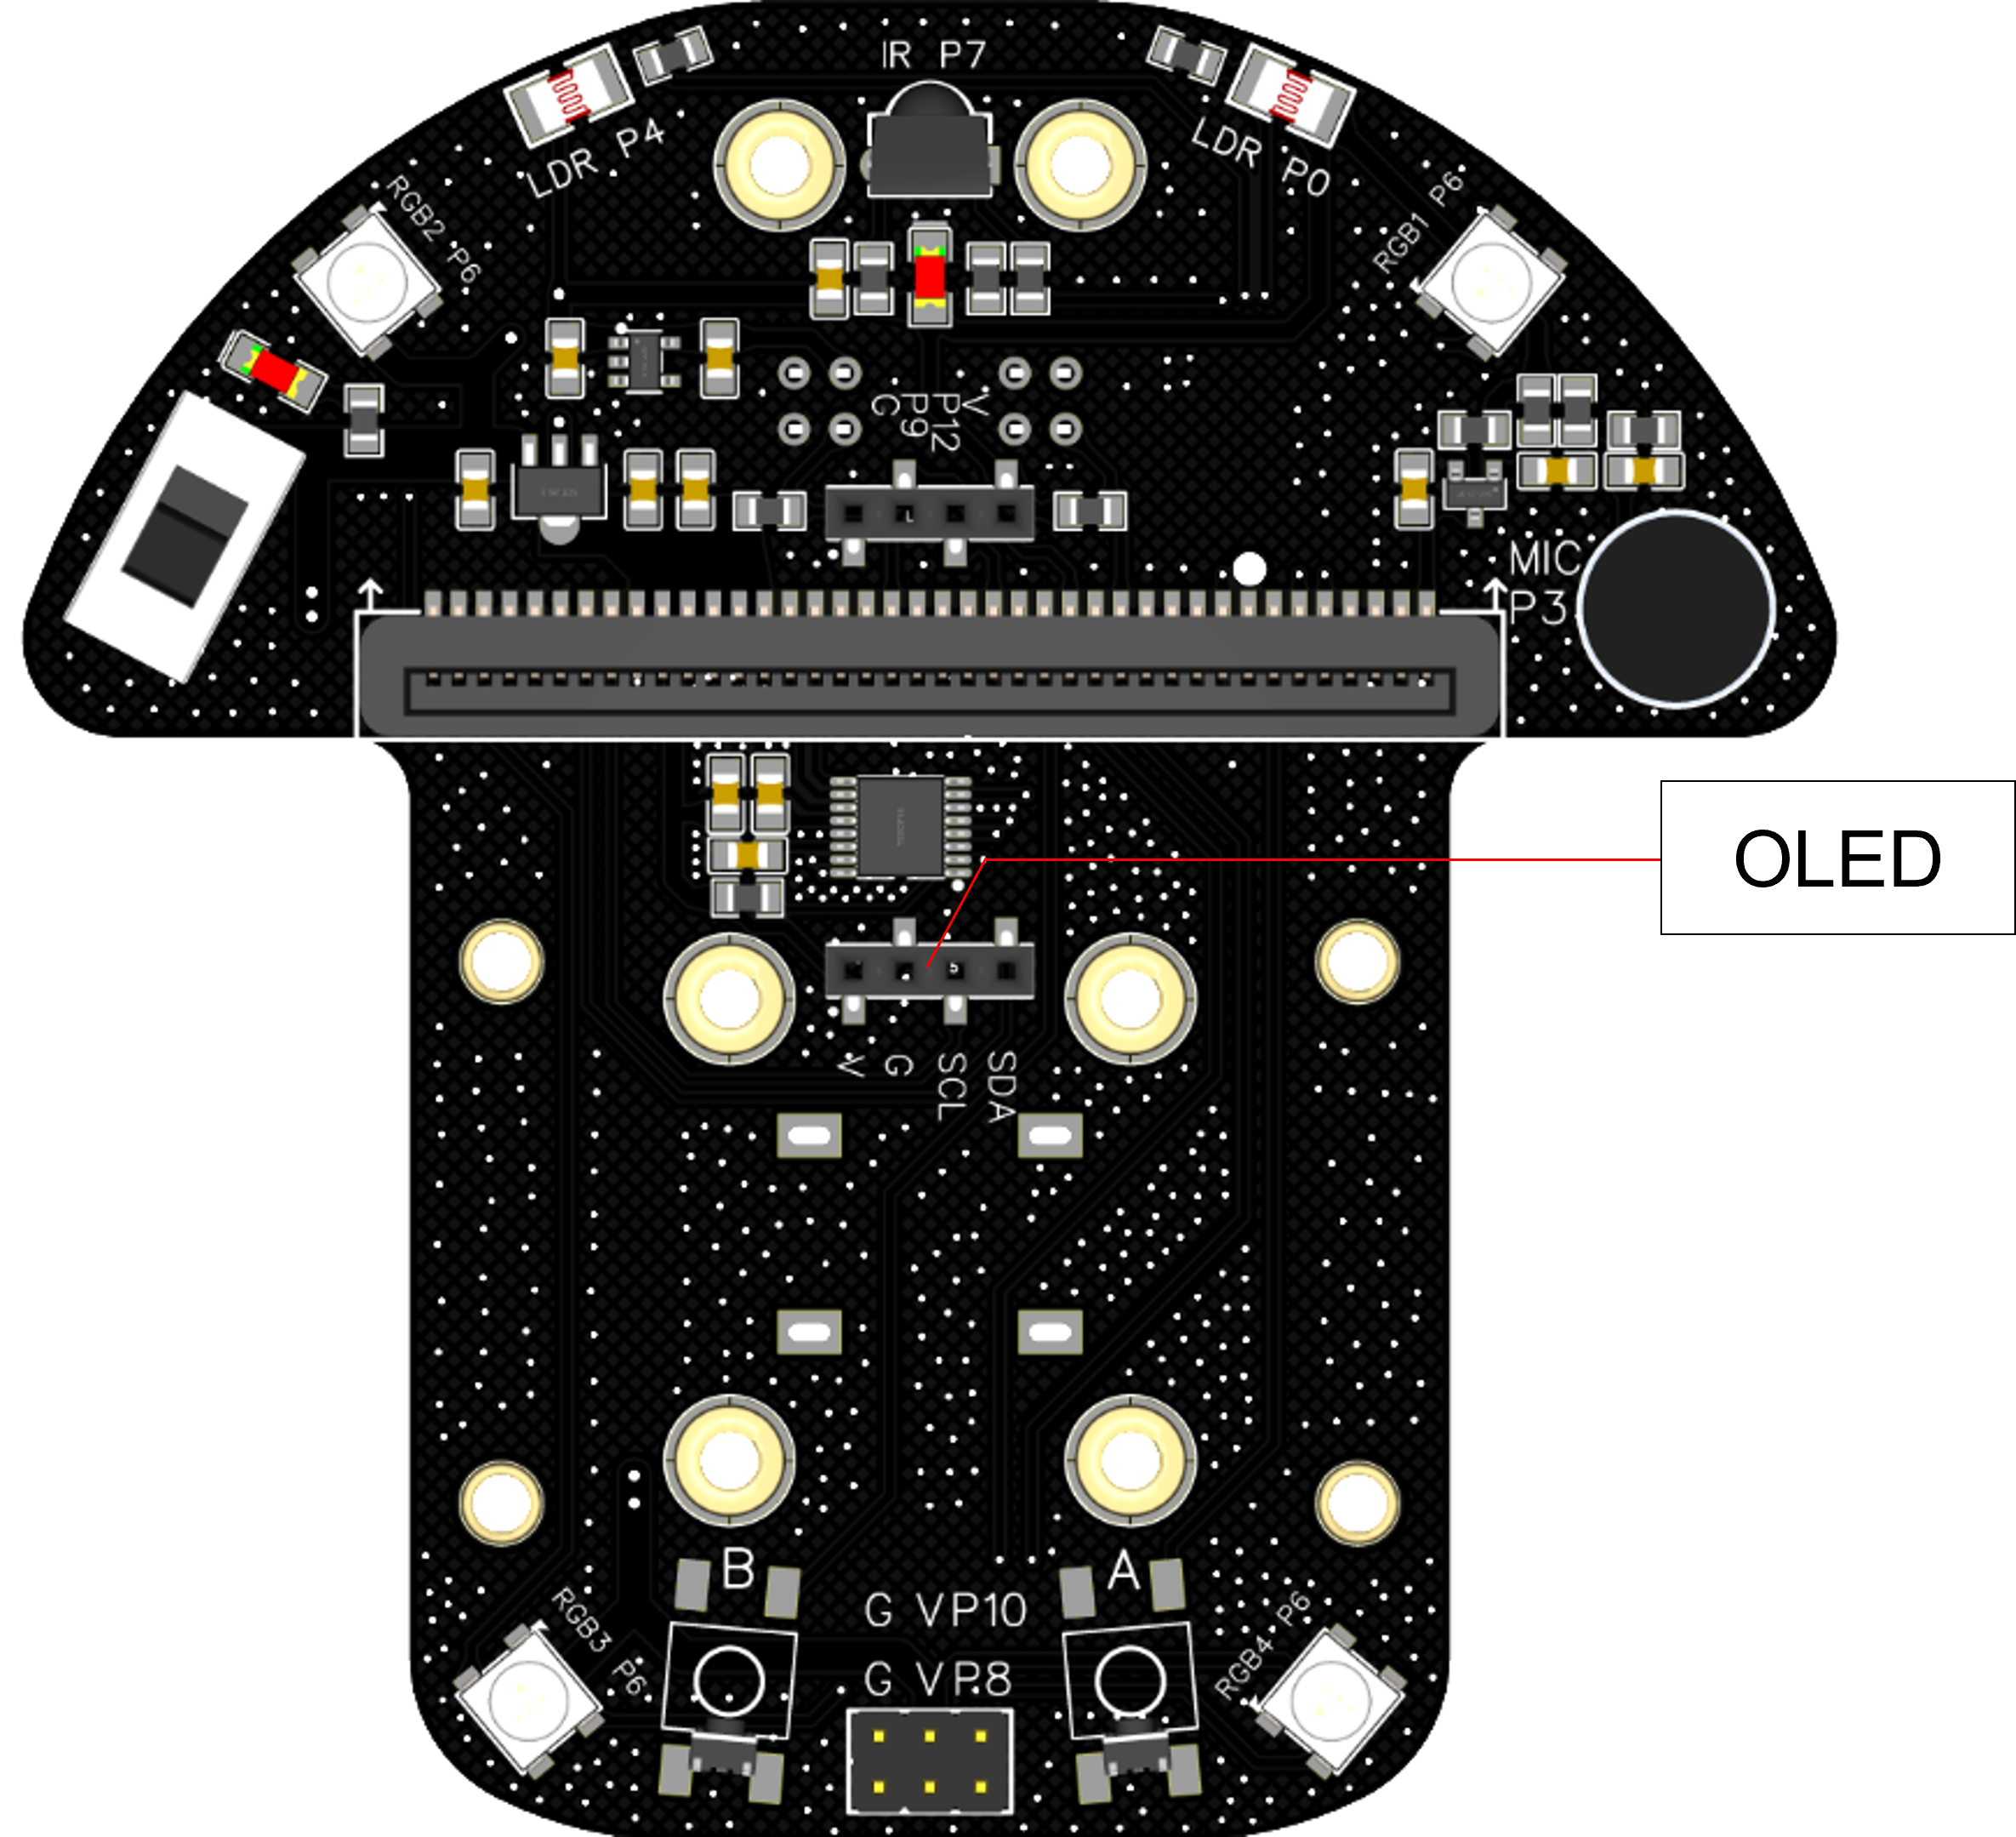
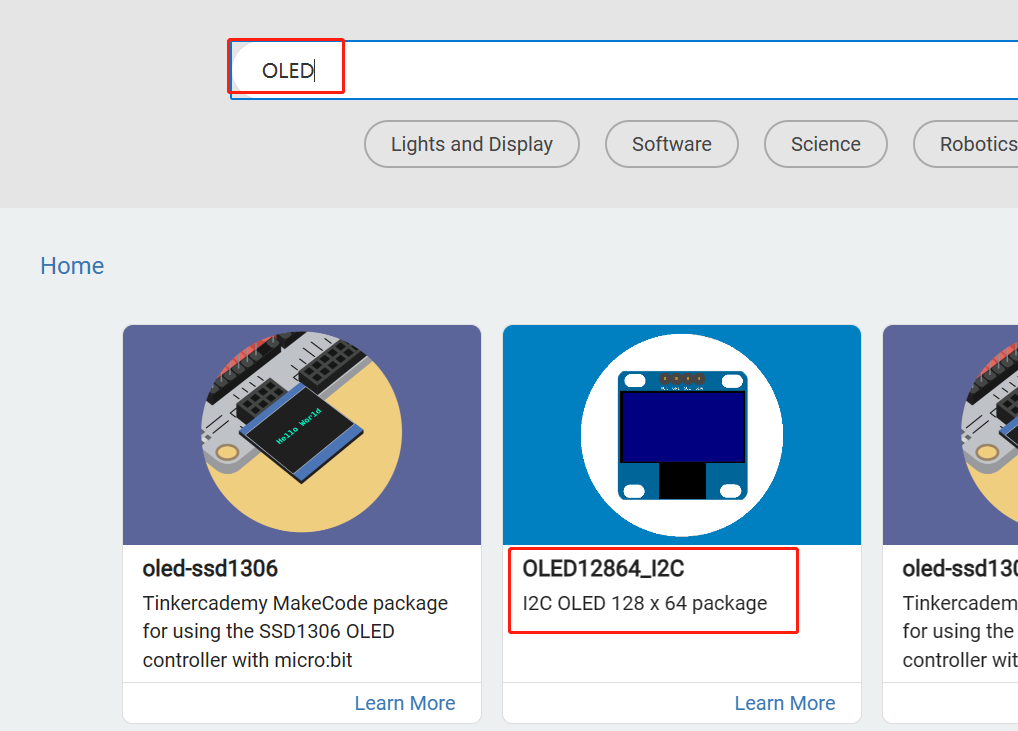
DeskPi MicroCar includes a 128×64 I2C OLED display module. Plug it into the 4-pin IIC header. In Extensions, search and add OLED12864_I2C.
The following example code prints text and real-time status onto the OLED screen:
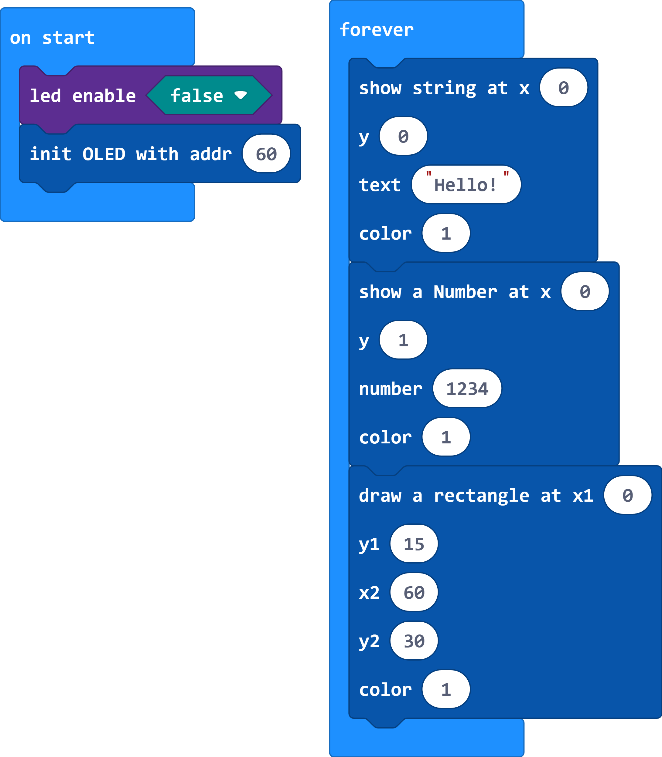
Note: Set
led enabletofalsewhen operating the OLED display.
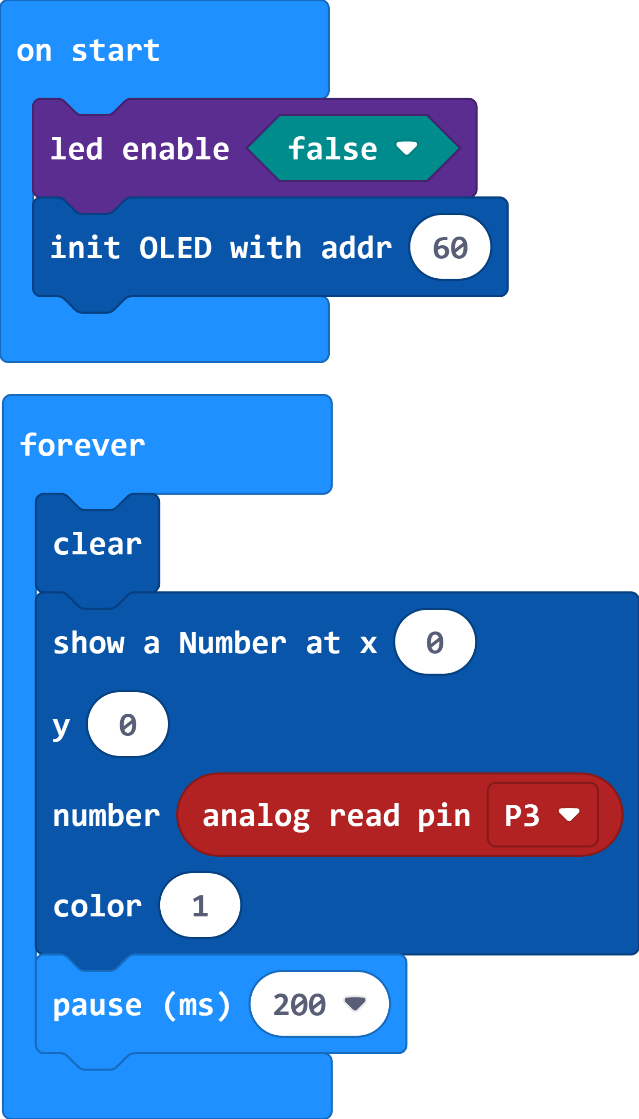
Sound & Volume Detection
DeskPi MicroCar includes an analog microphone sound sensor pre-wired to Pin3.
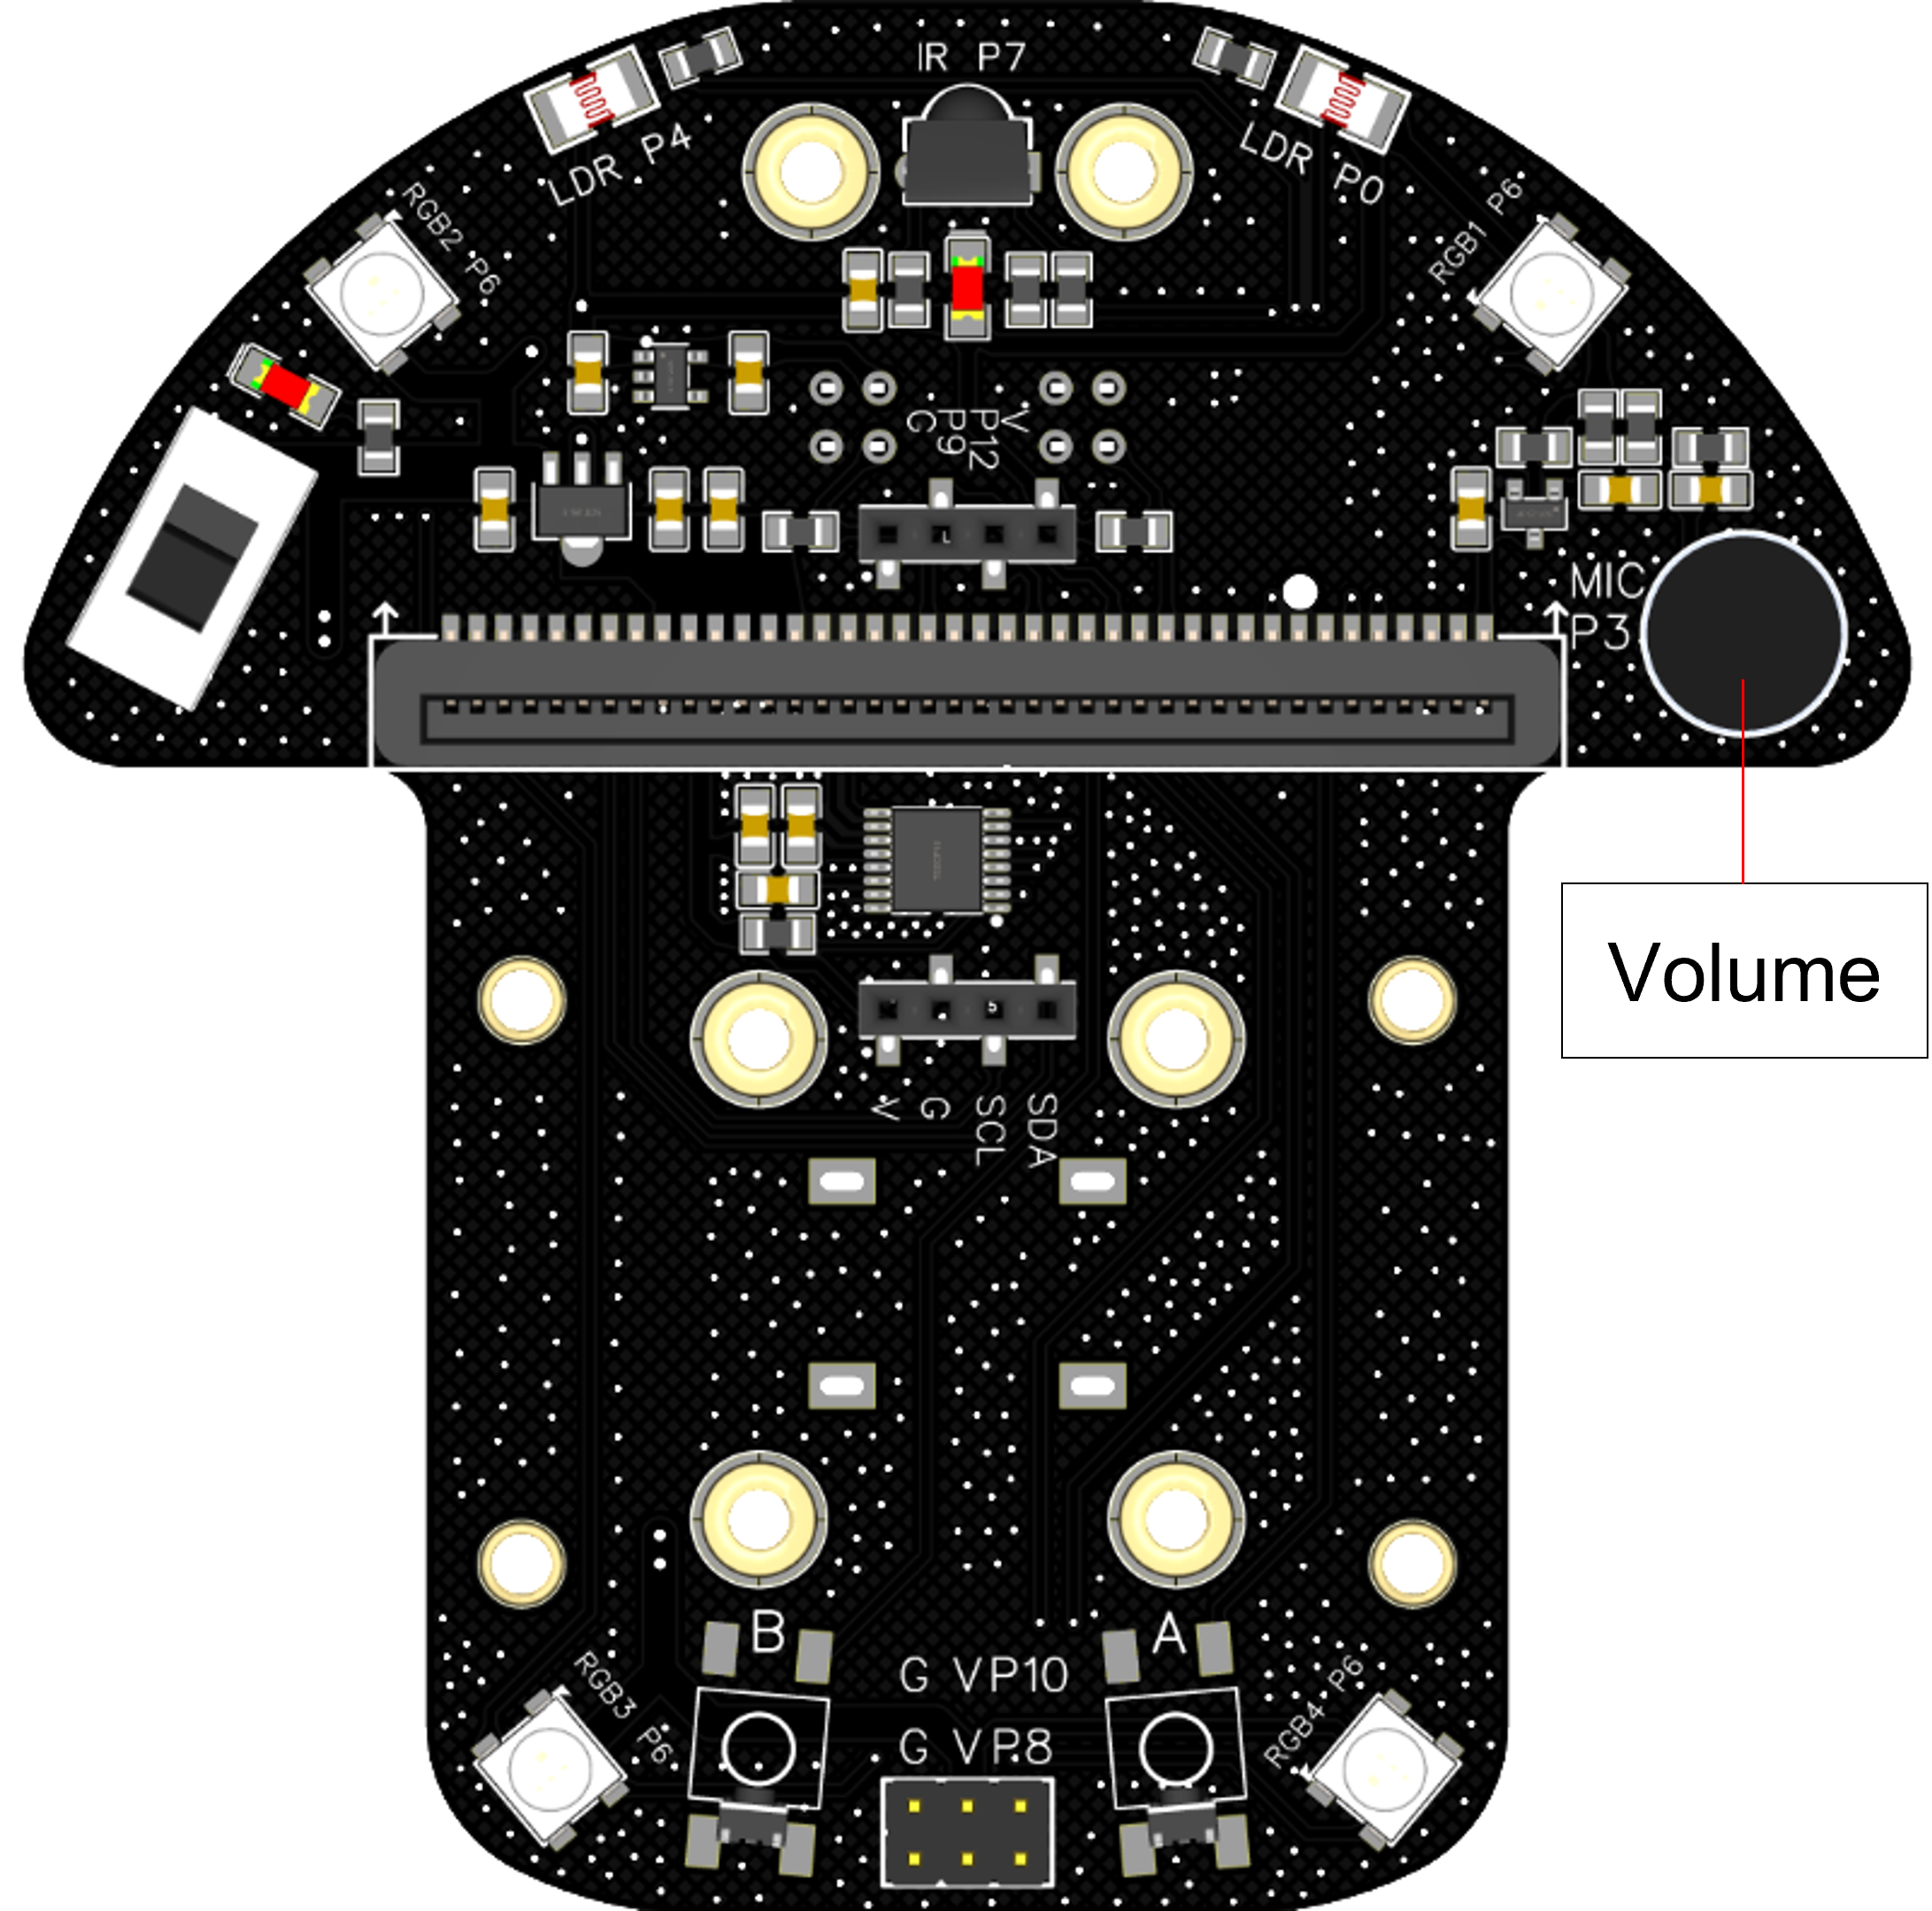
Flash the program below to read ambient sound levels and display dynamic decibel values on the OLED screen:
Optical Sensors
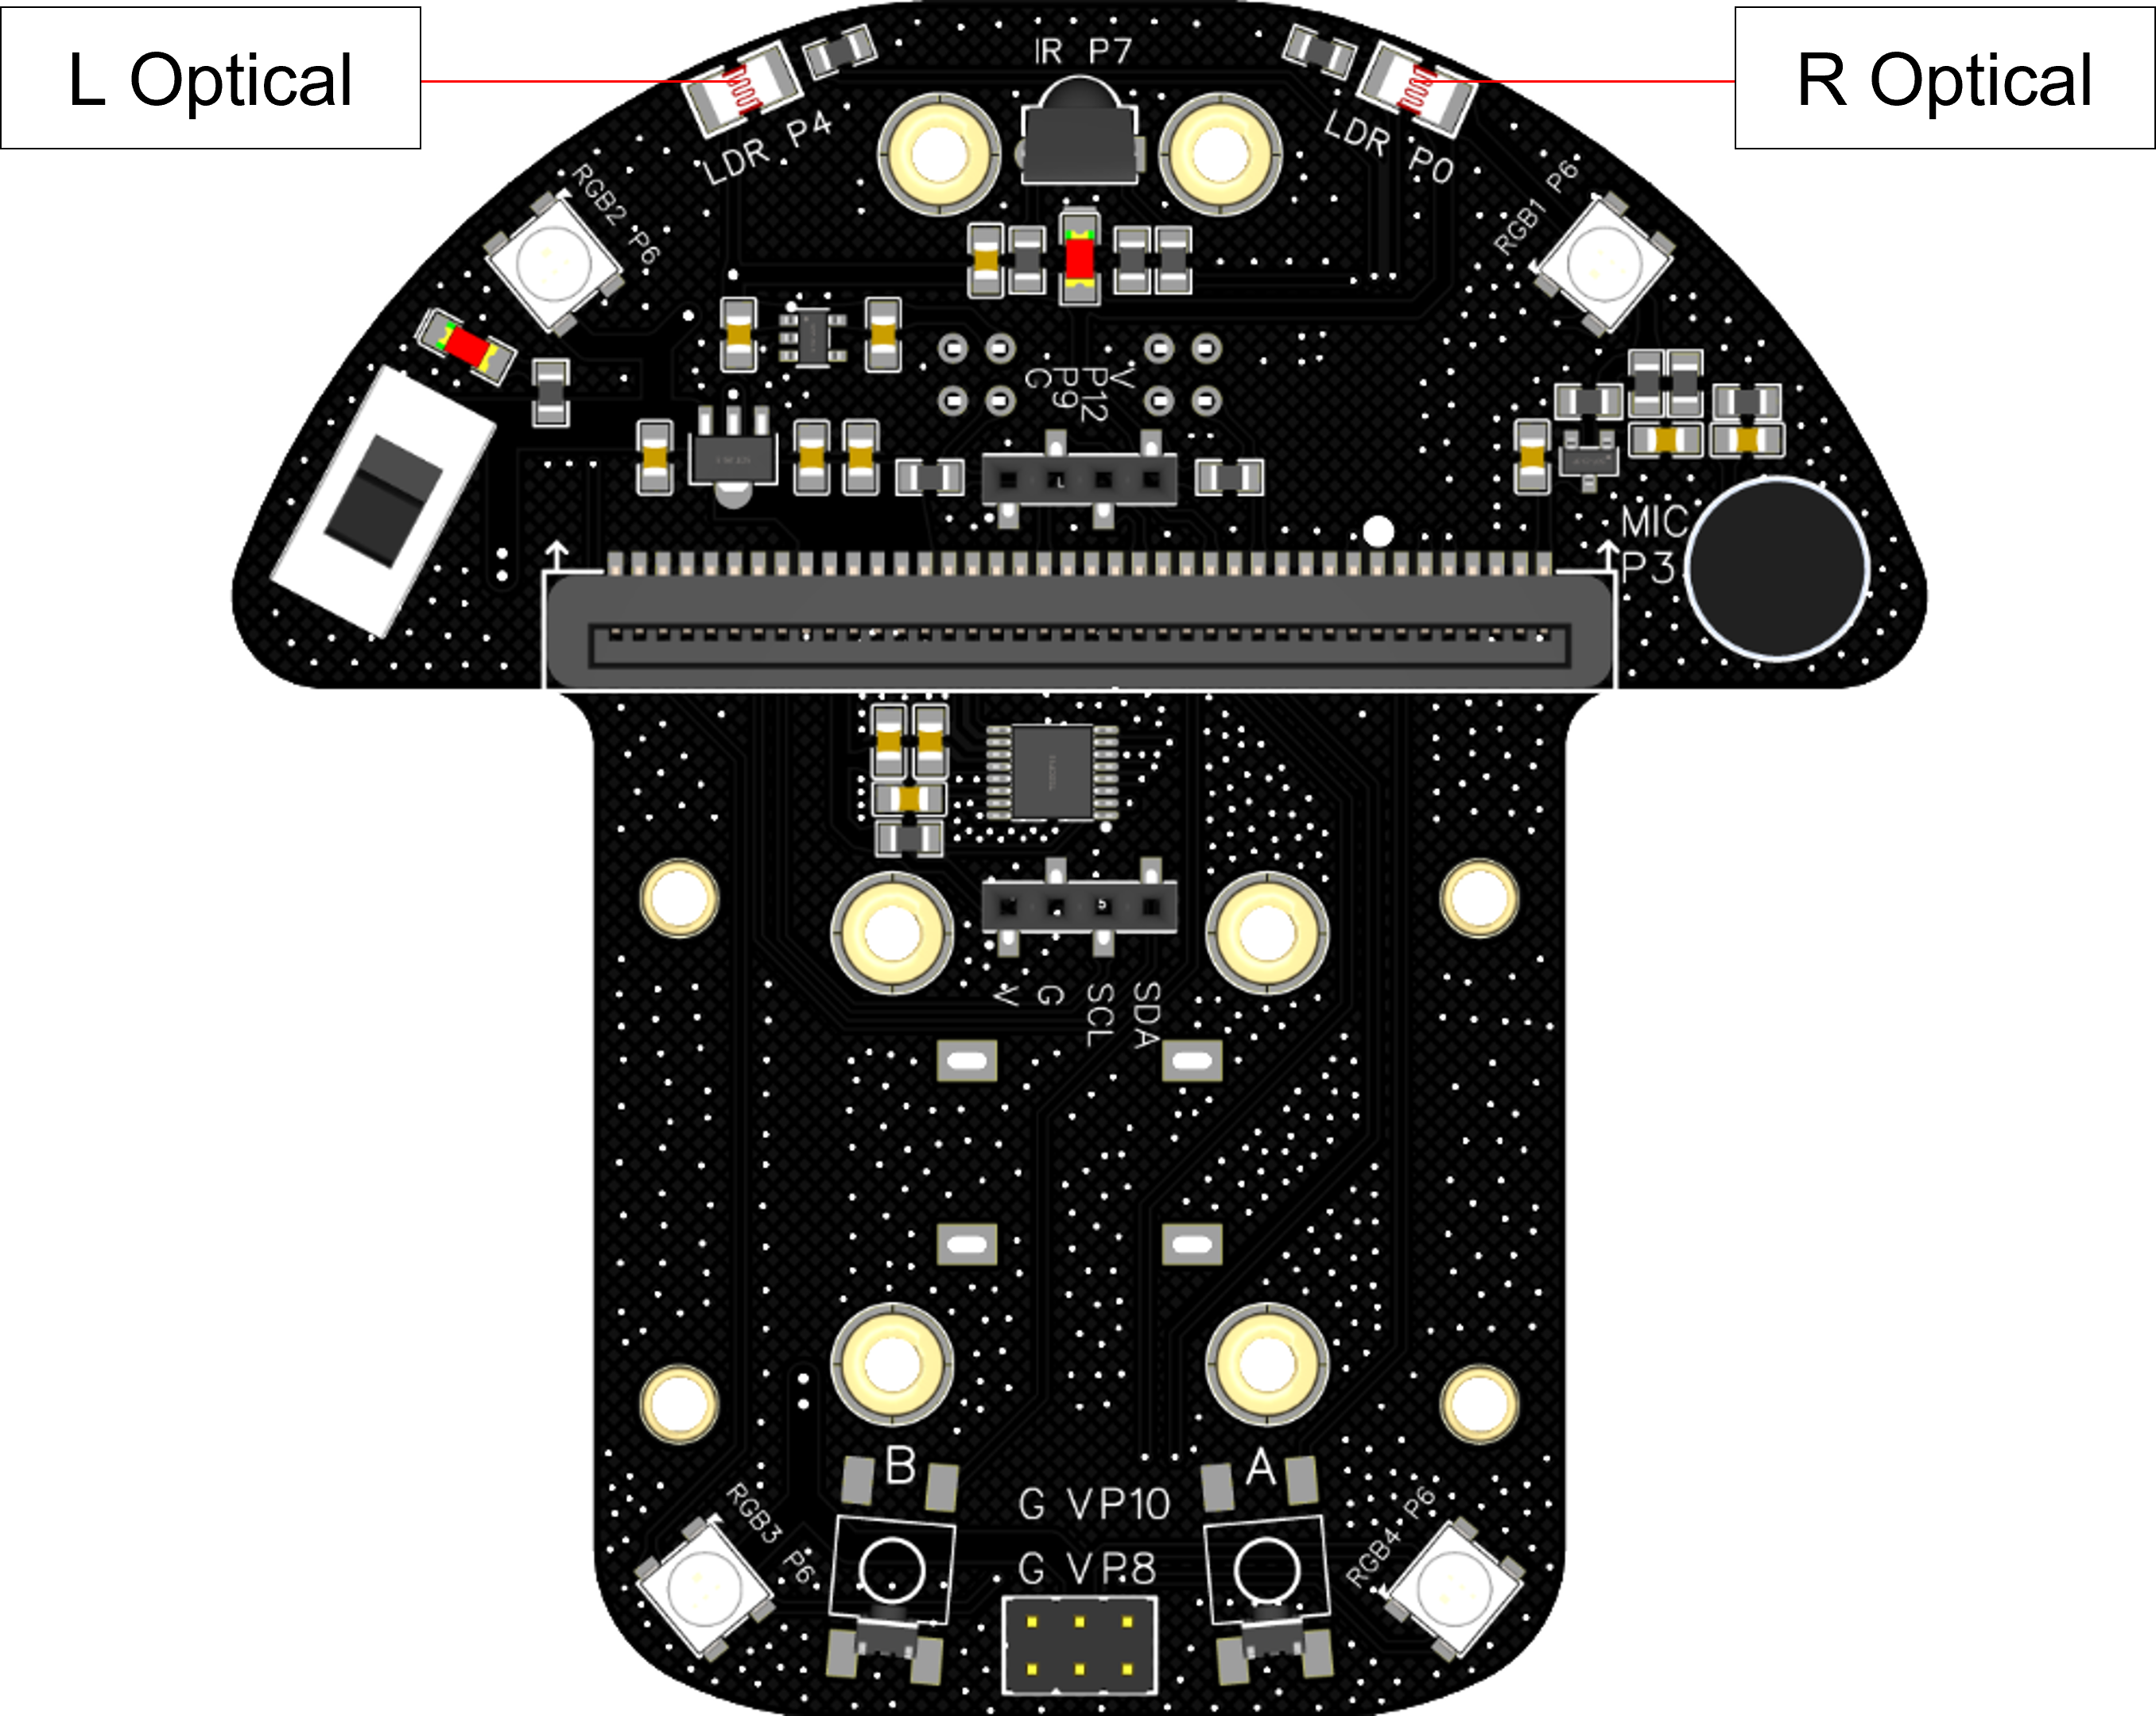
DeskPi MicroCar has two optical sensors pre-wired to Pin0 (right) and Pin4 (left). Using the OLED display to show readouts:
Download the program below to observe light exposure values dynamically changing on the OLED:
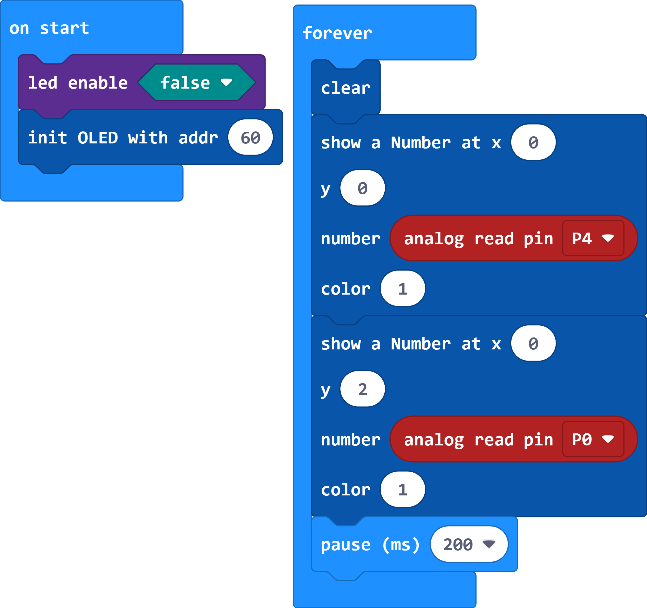
Note: Make sure led enable is set to false as optical sensor input requires it.
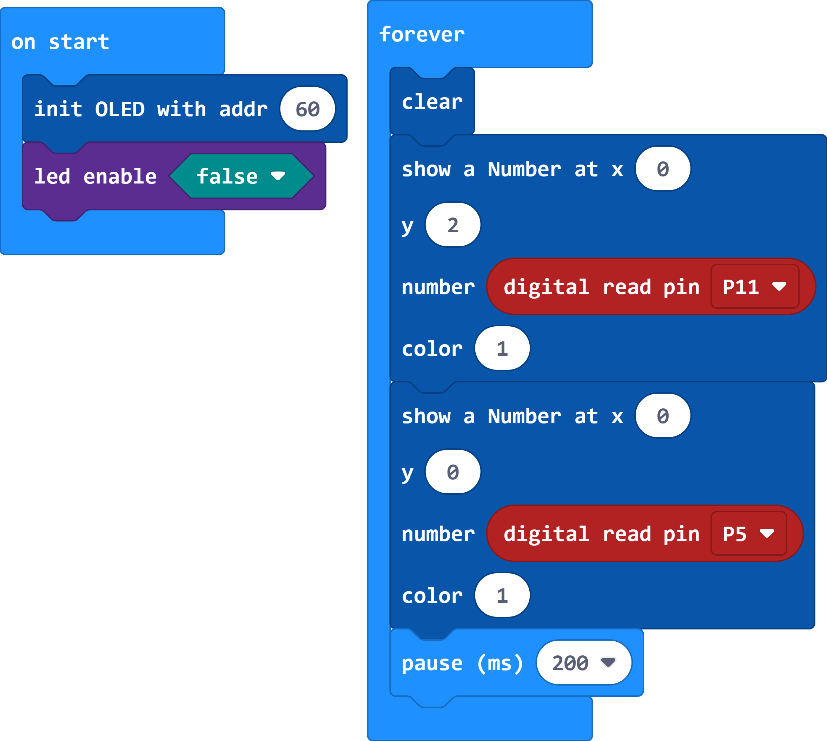
Button Inputs
DeskPi MicroCar features two push buttons pre-wired to Pin5 (right) and Pin11 (left):
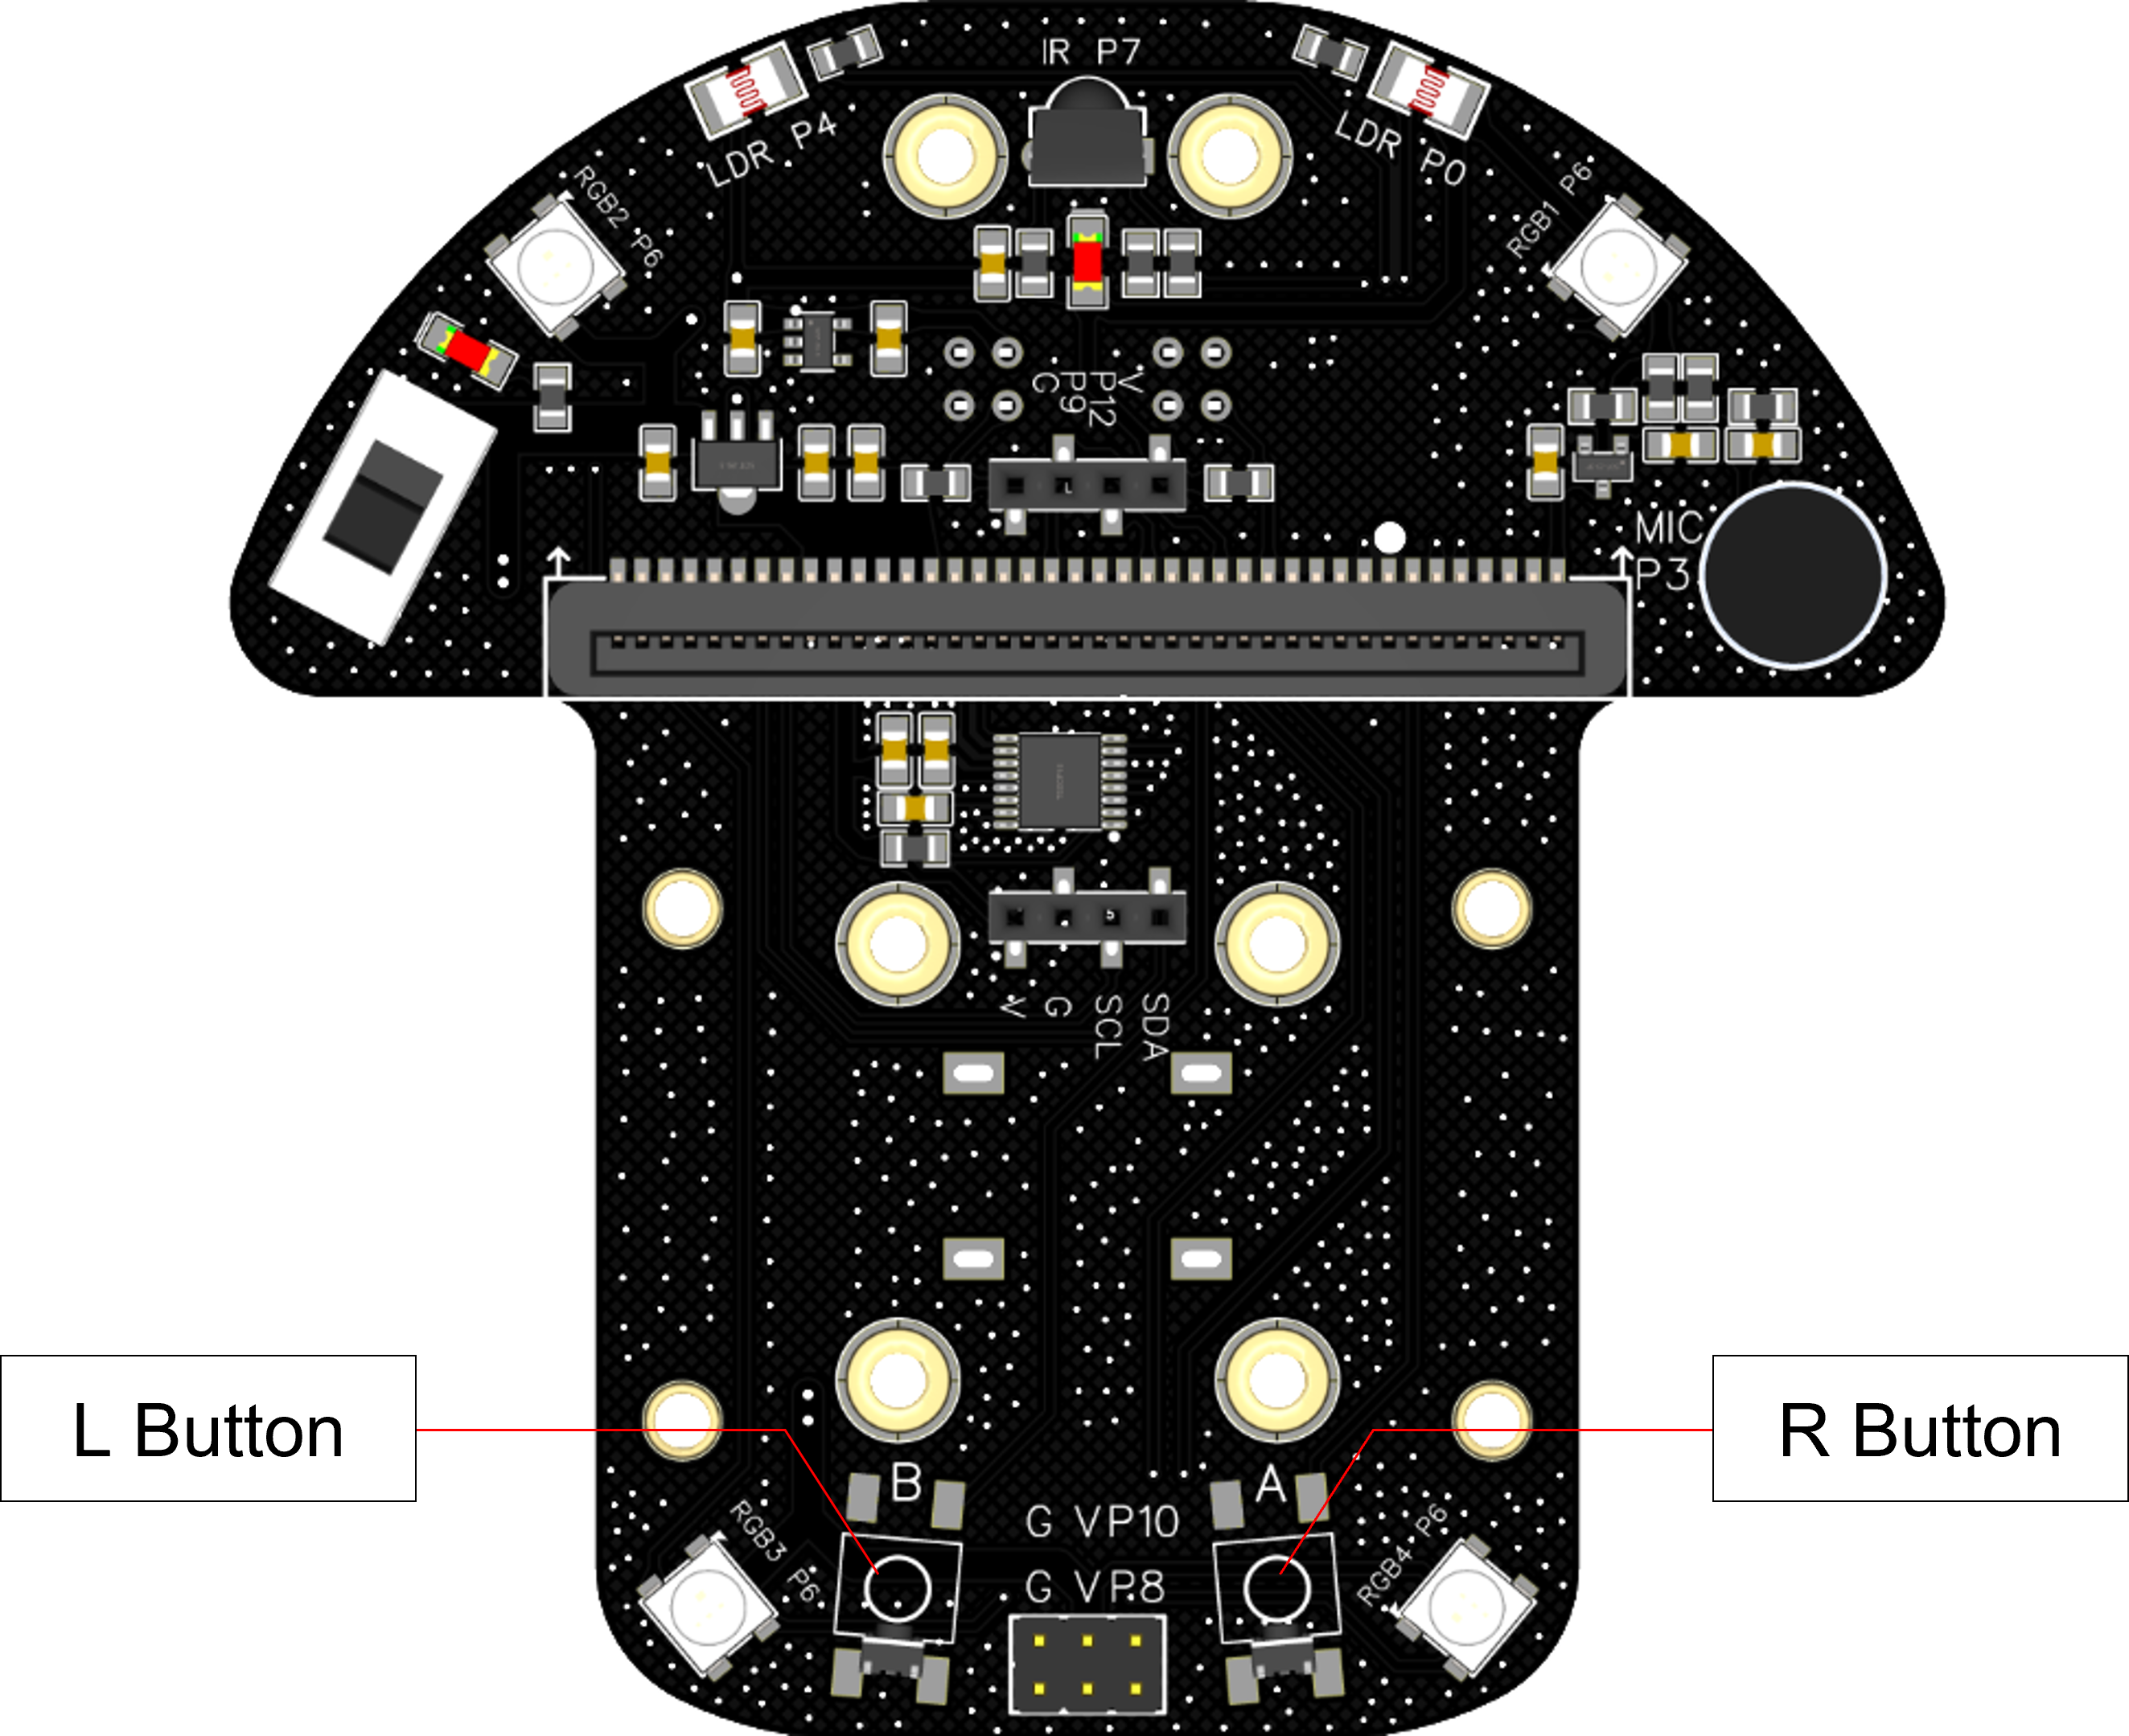
Download the program below to inspect button press state changes (0 or 1) on the OLED display:
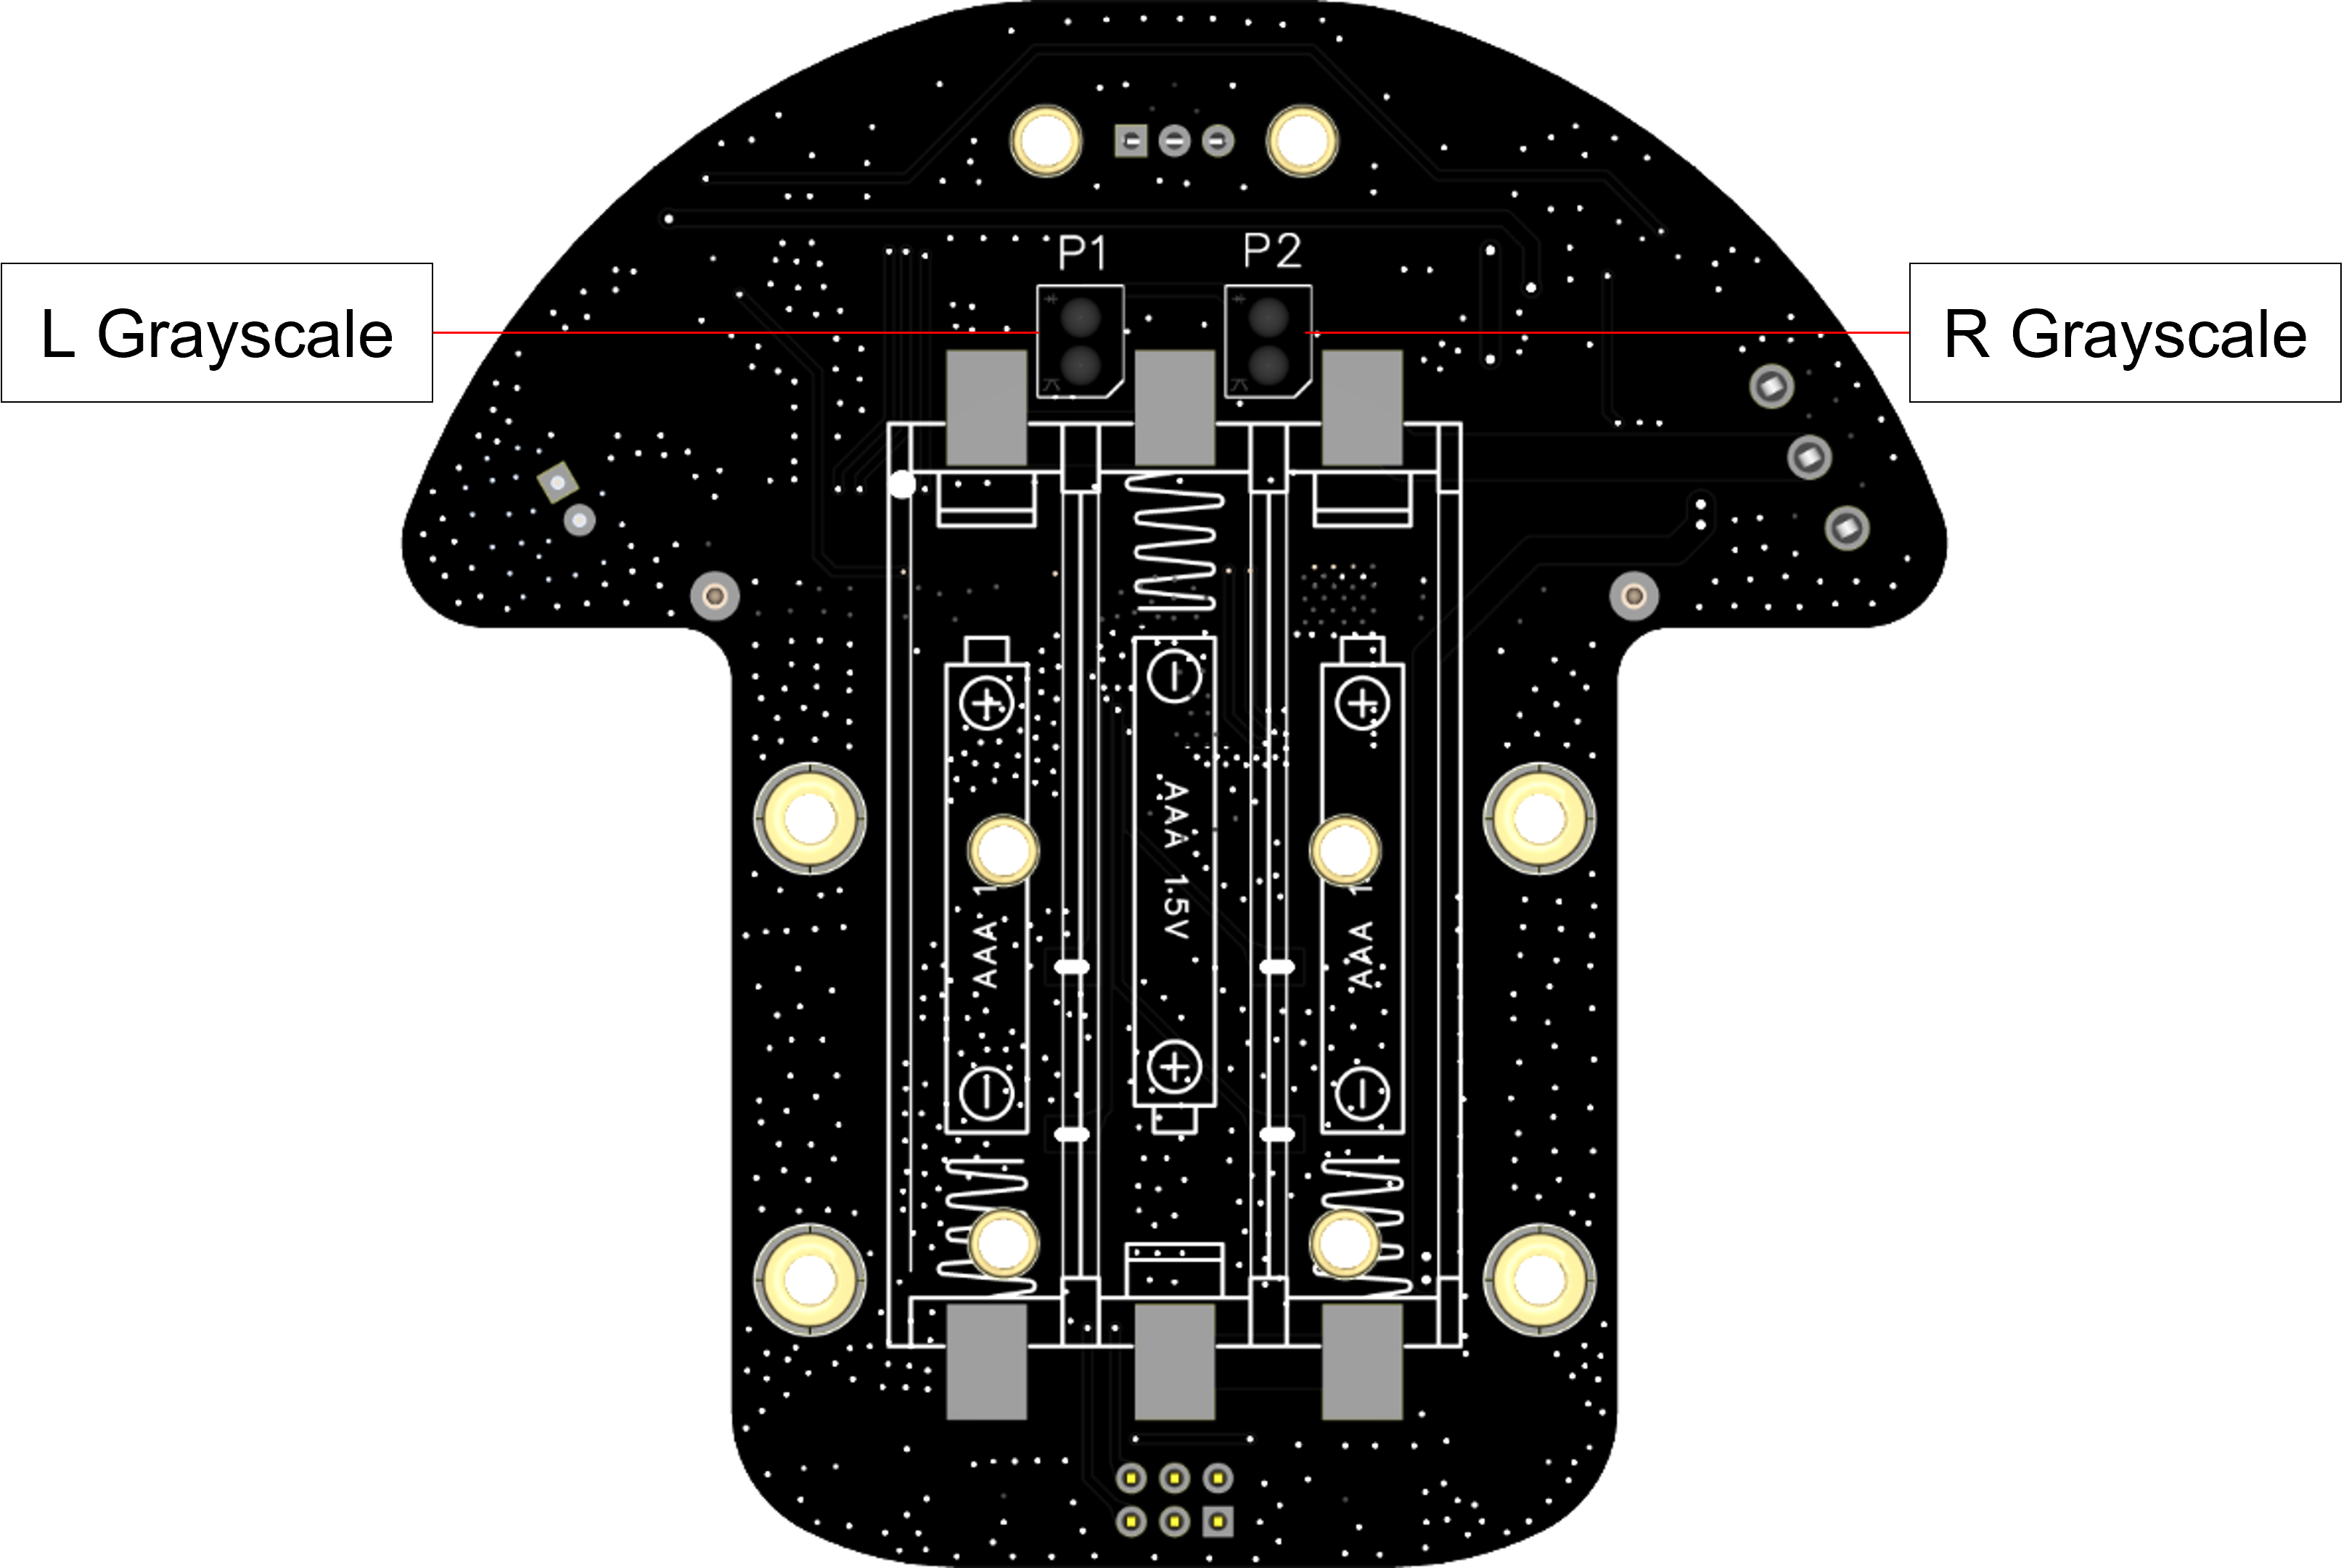
Grayscale Sensors
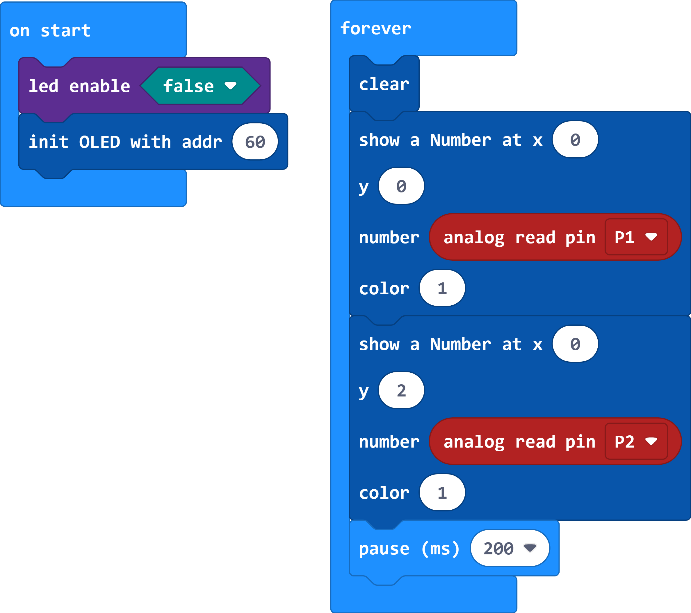
DeskPi MicroCar has two line-tracking grayscale sensors pre-wired to Pin2 (right) and Pin1 (left):
Download the program below. Placing the sensor over black or white lines will display varying contrast readings on the OLED:
Ultrasonic Distance Sensor
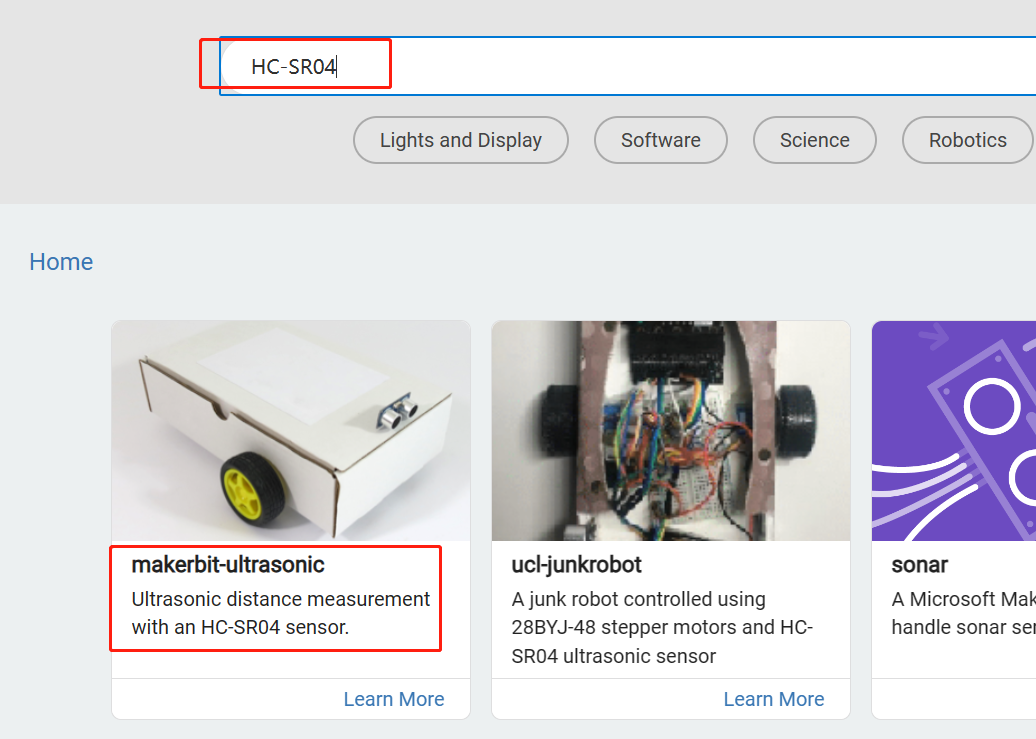
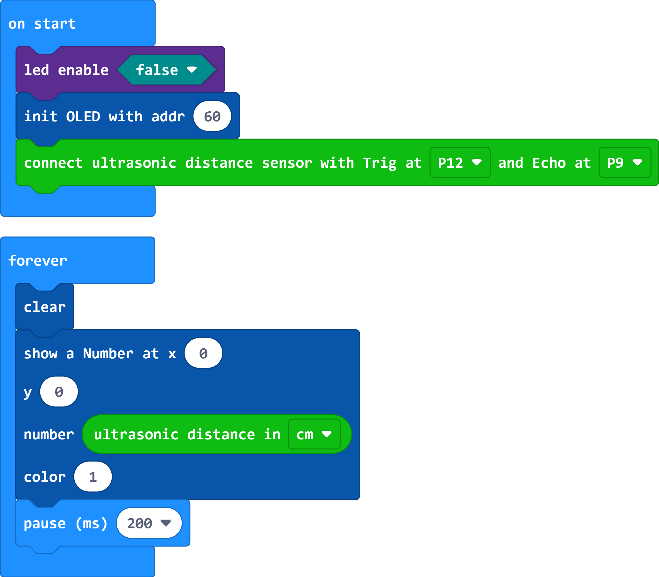
DeskPi MicroCar includes an HC-SR04 ultrasonic rangefinder. The Echo signal connects to Pin9 and Trig connects to Pin12. In Extensions, add makerbit-ultrasonic.
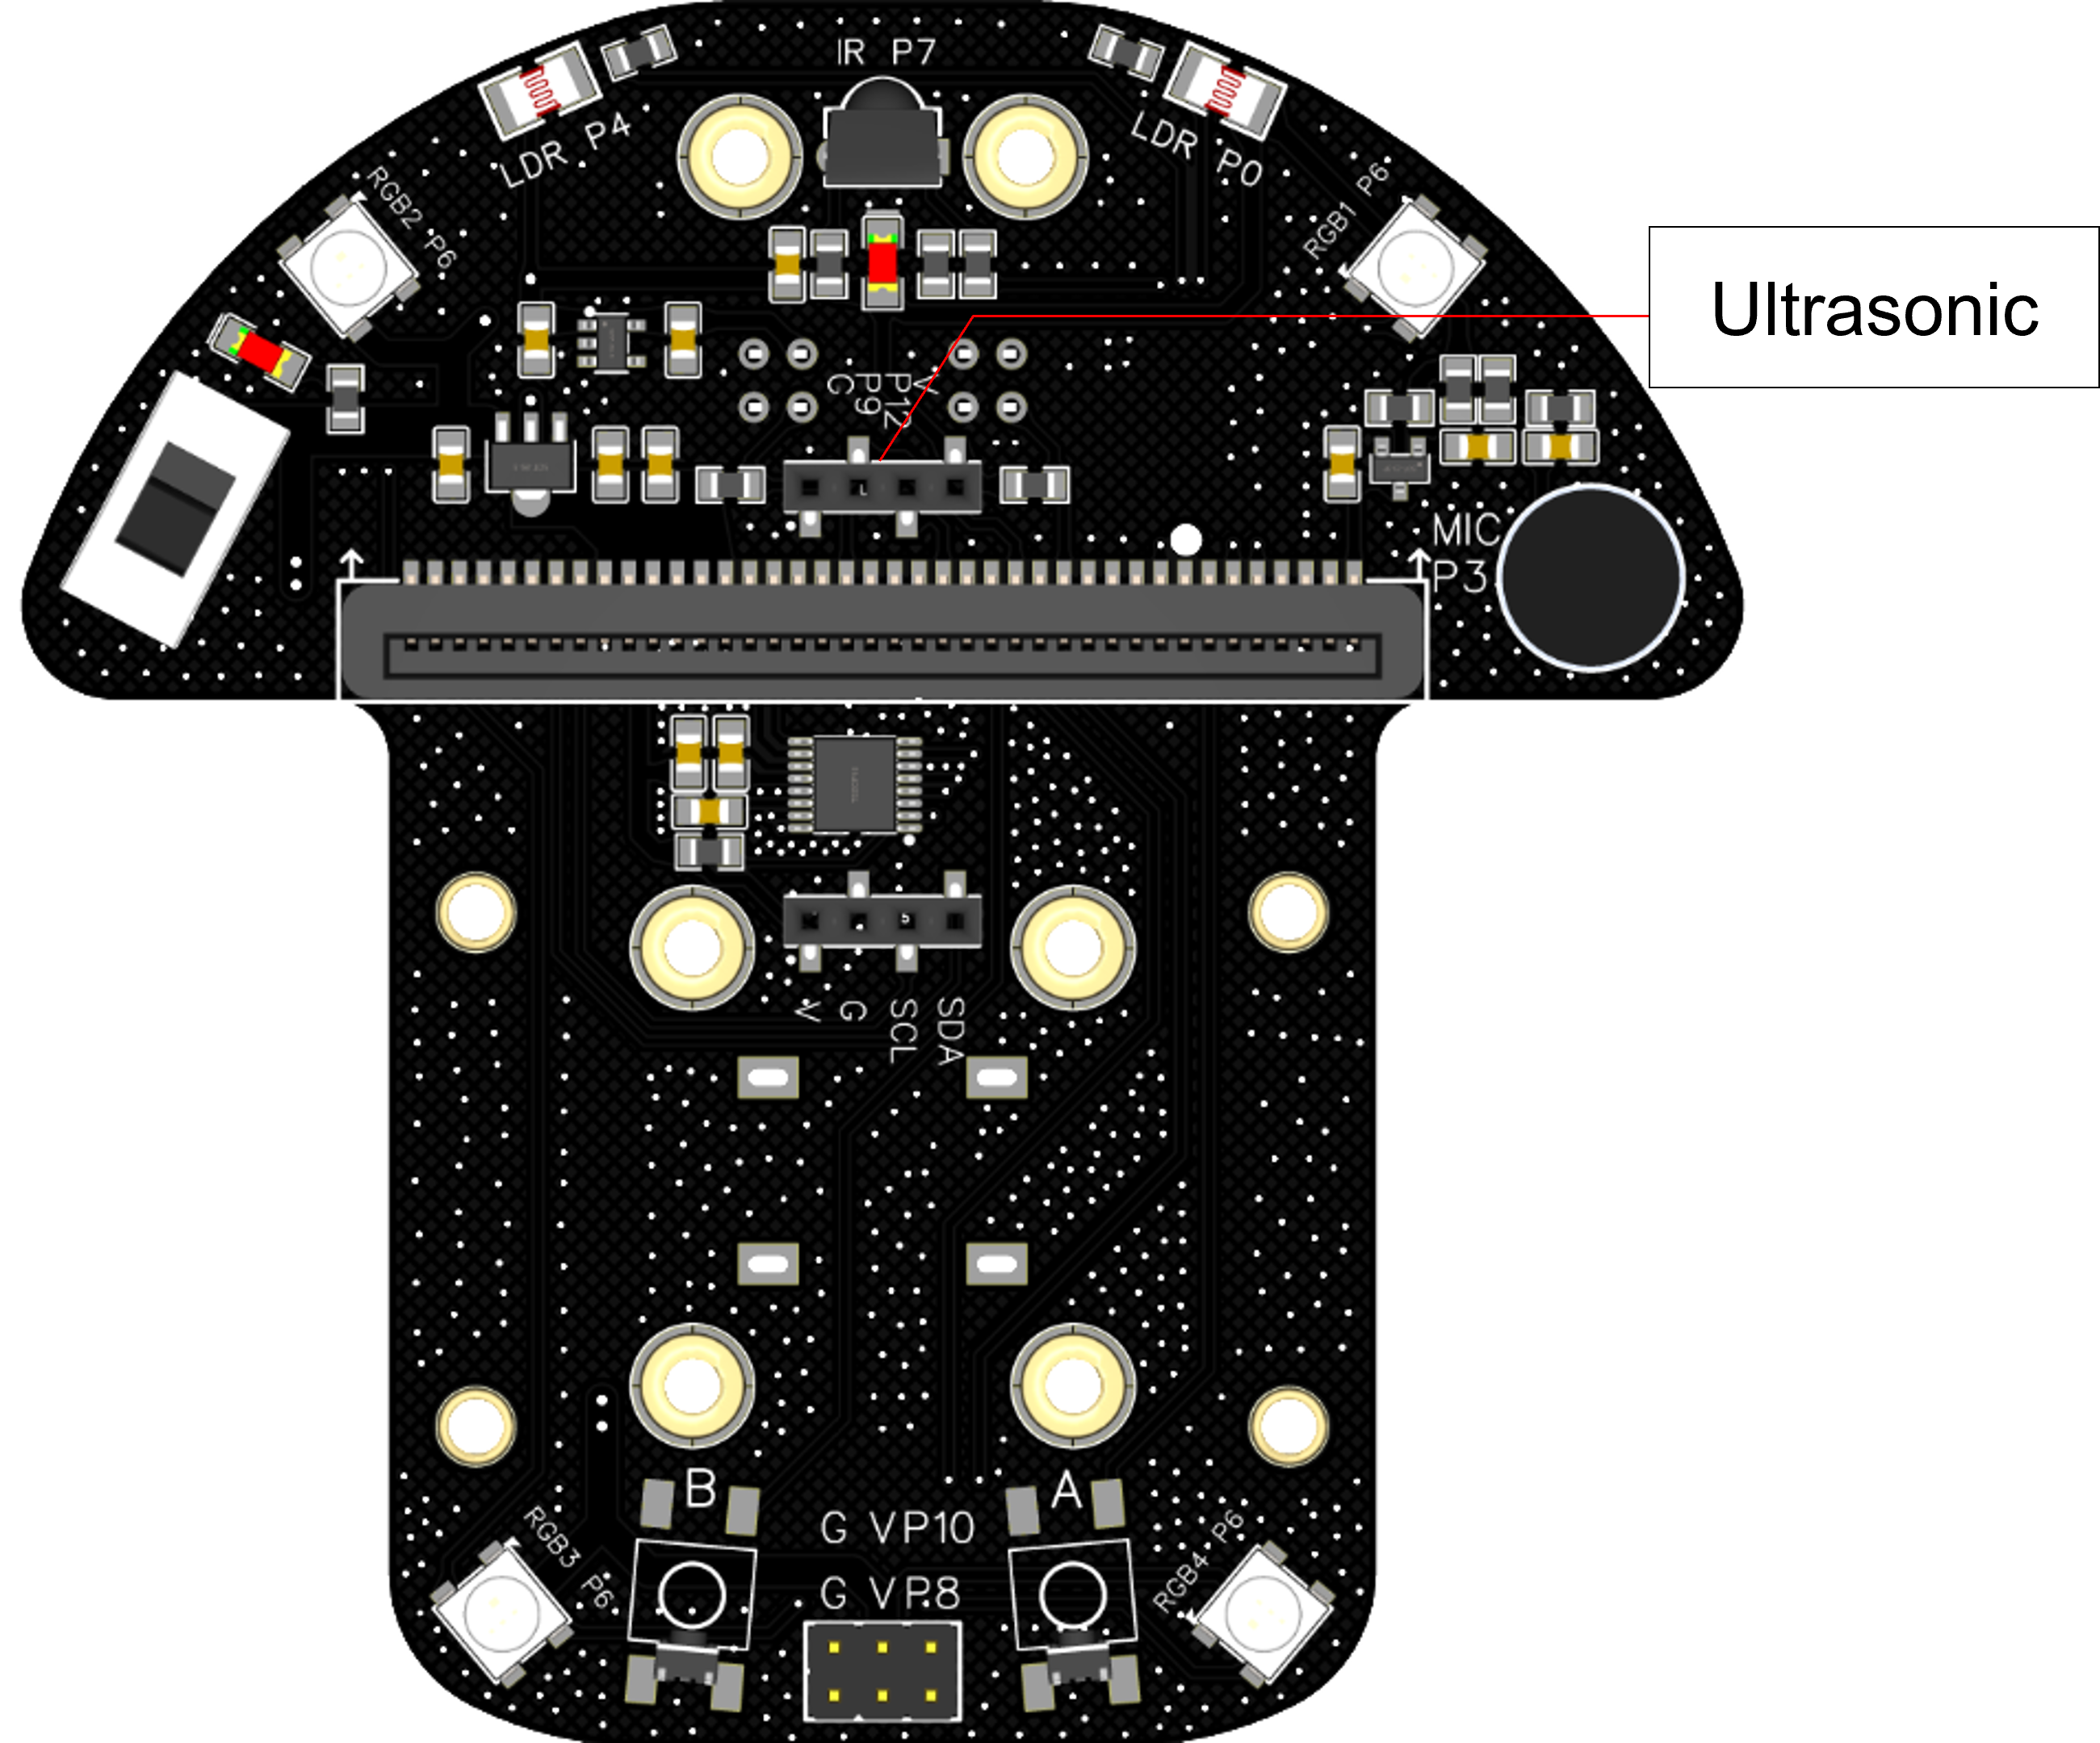
Run the code below to measure obstacle distances in real-time on the OLED display:
IR Receiver & Remote Control
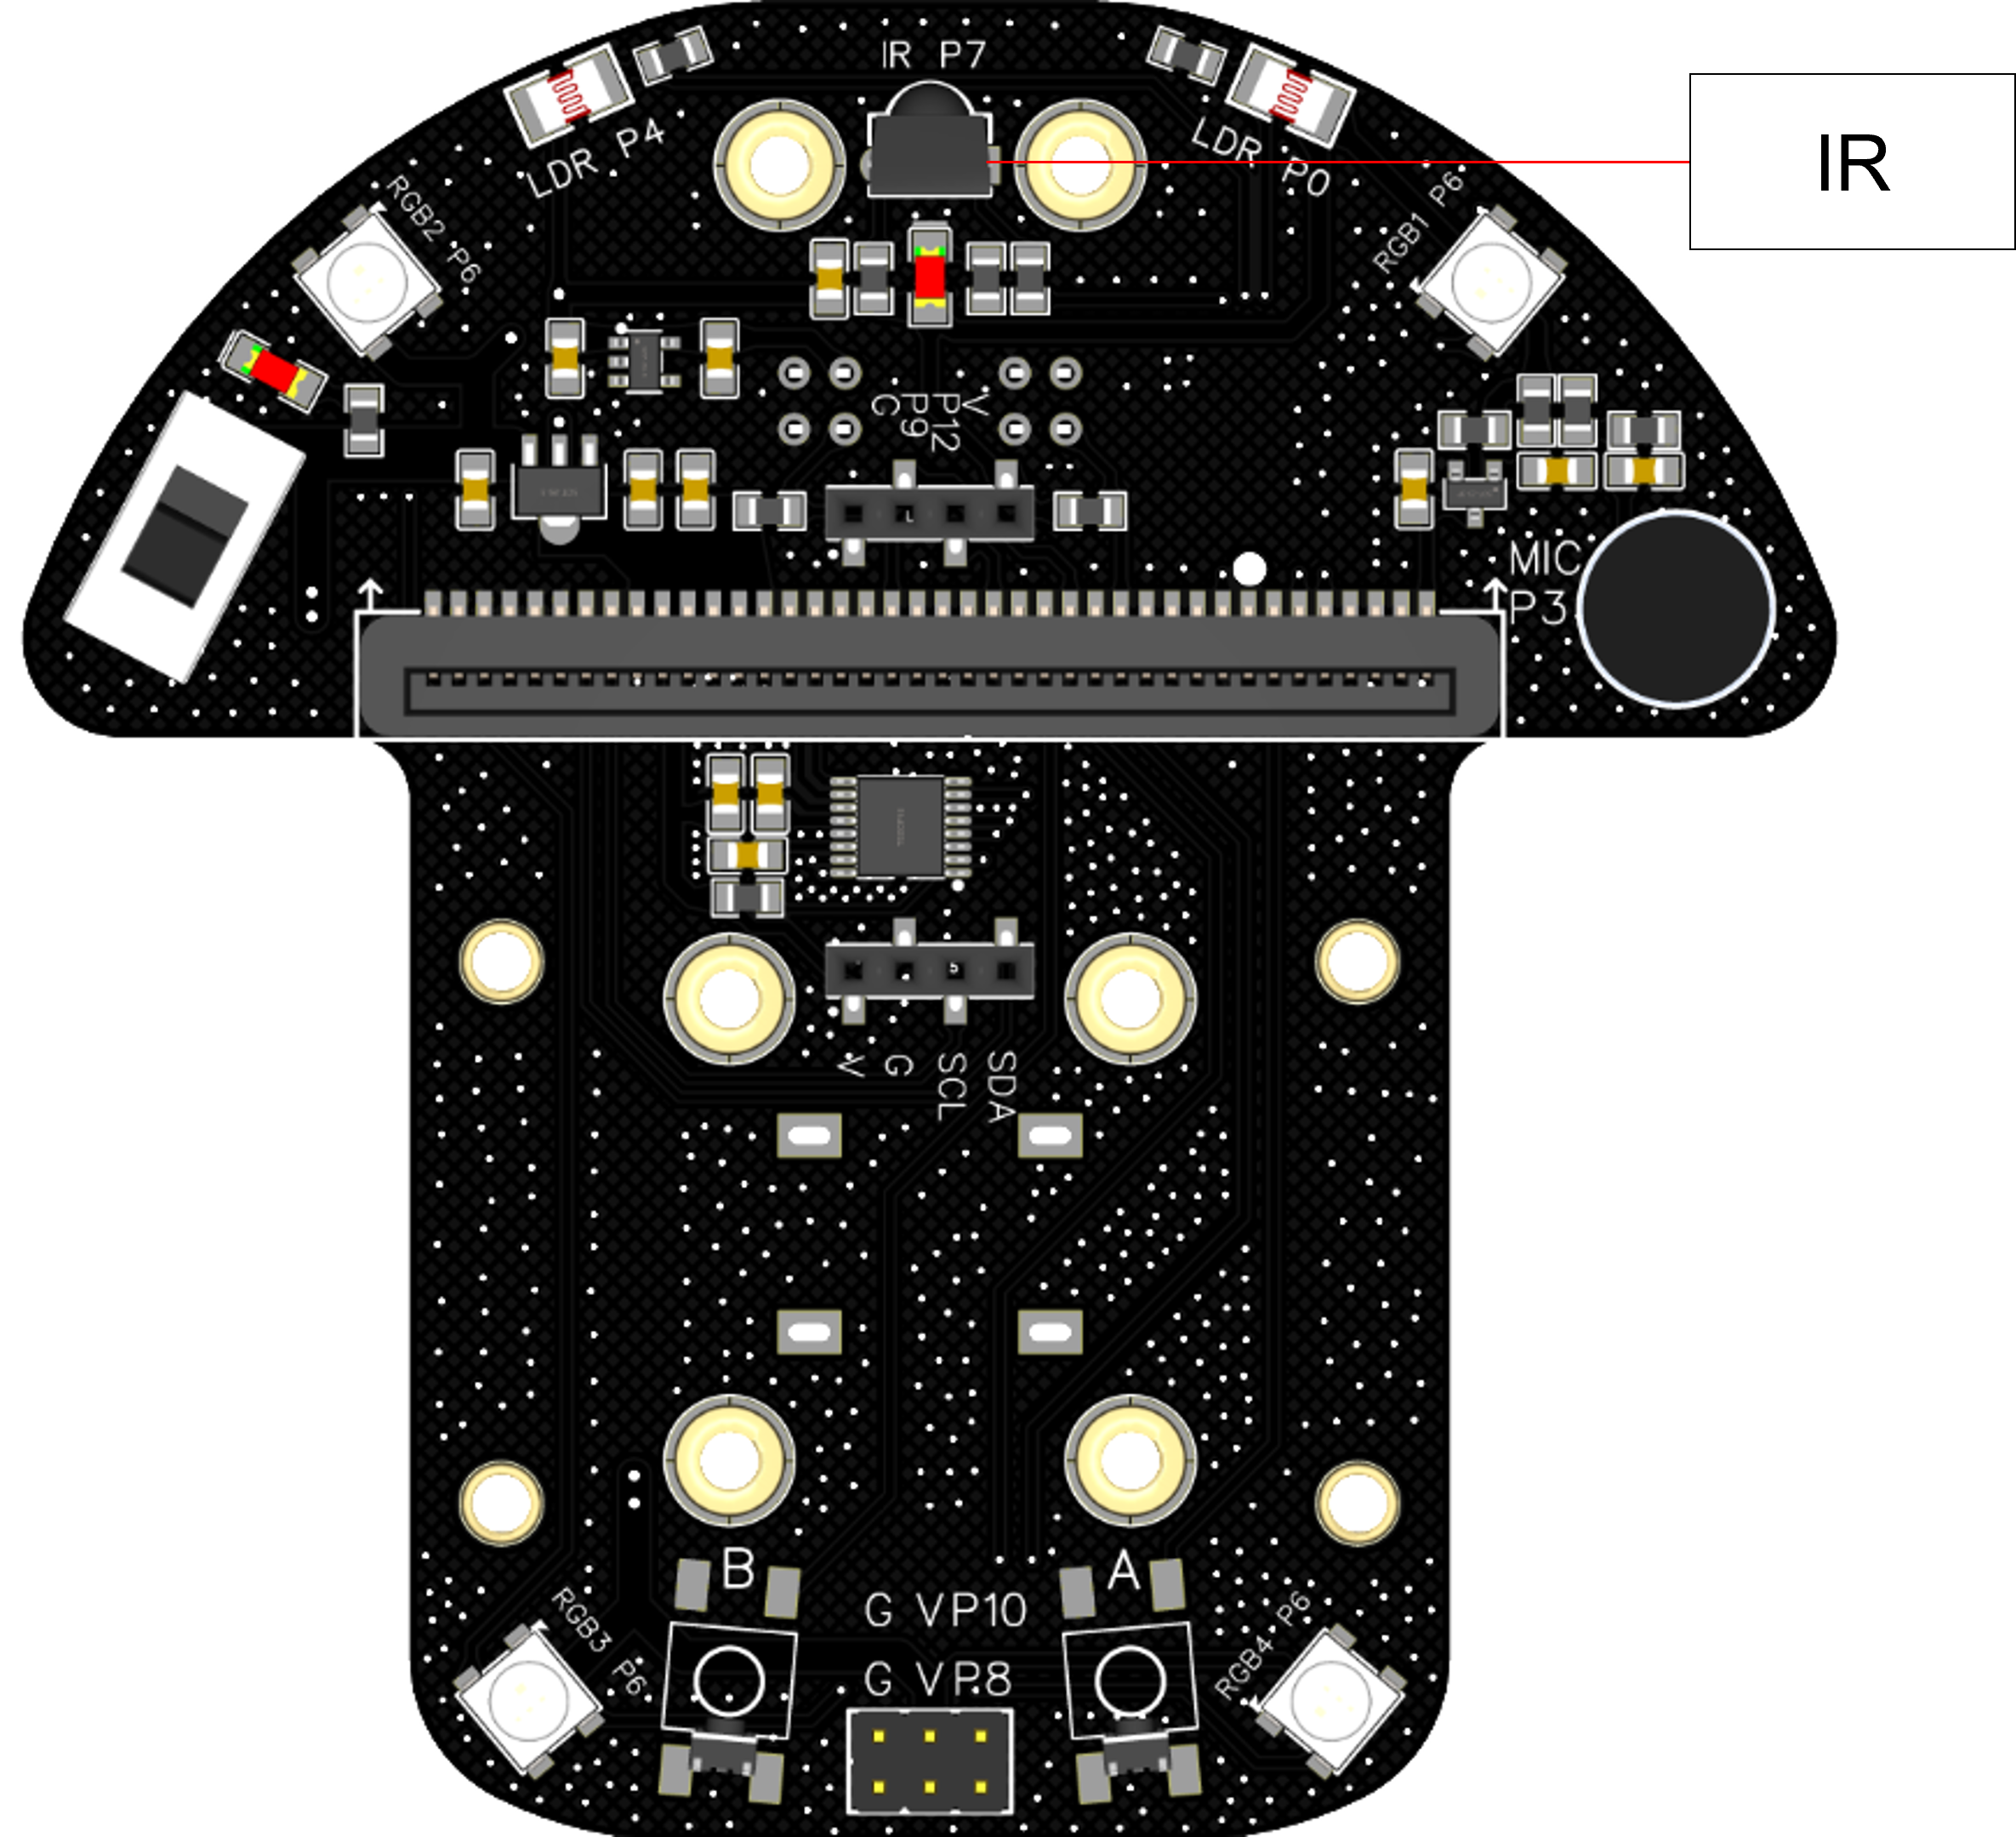
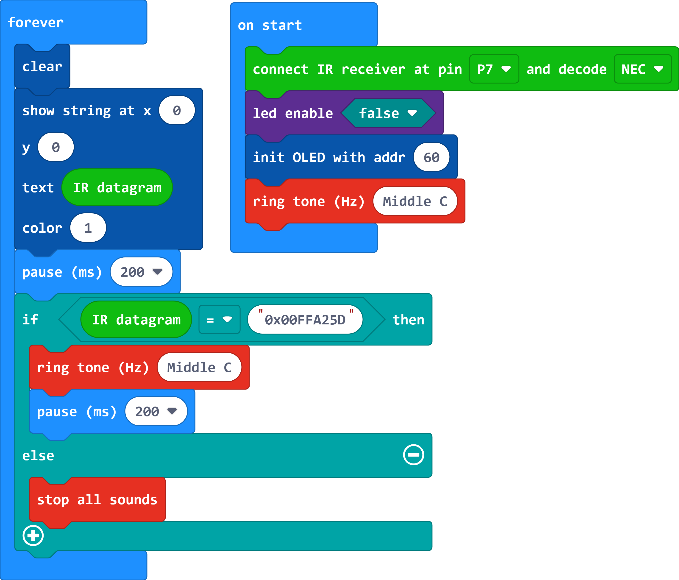
DeskPi MicroCar features an onboard infrared receiver wired to Pin7. In Extensions, add makerbit-ir-receiver.
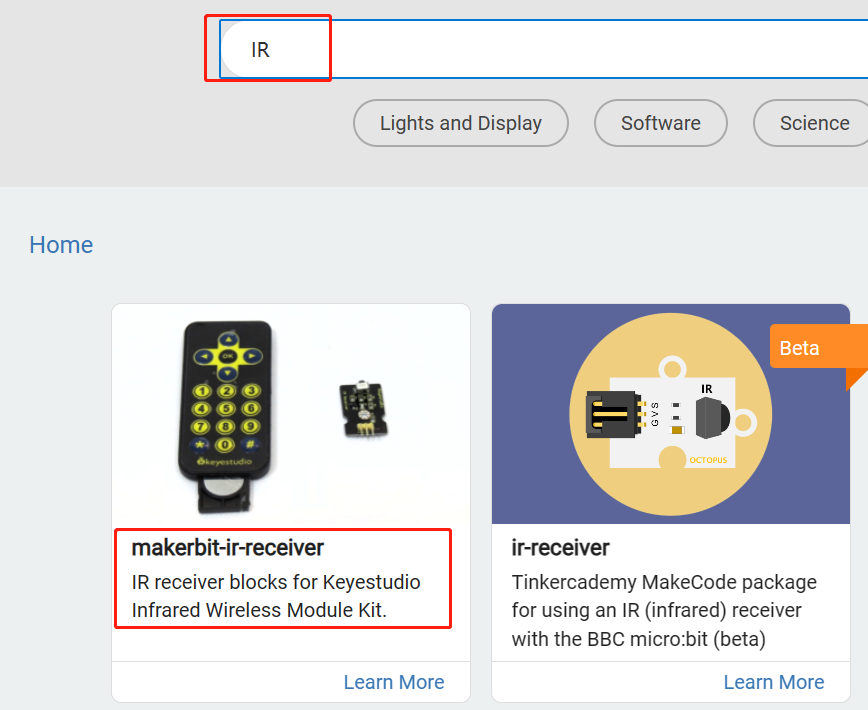
Press buttons on the handheld IR remote to display hex keycodes on the OLED screen (e.g., 0x00FFA25D for the power key):

Motor Drive Control
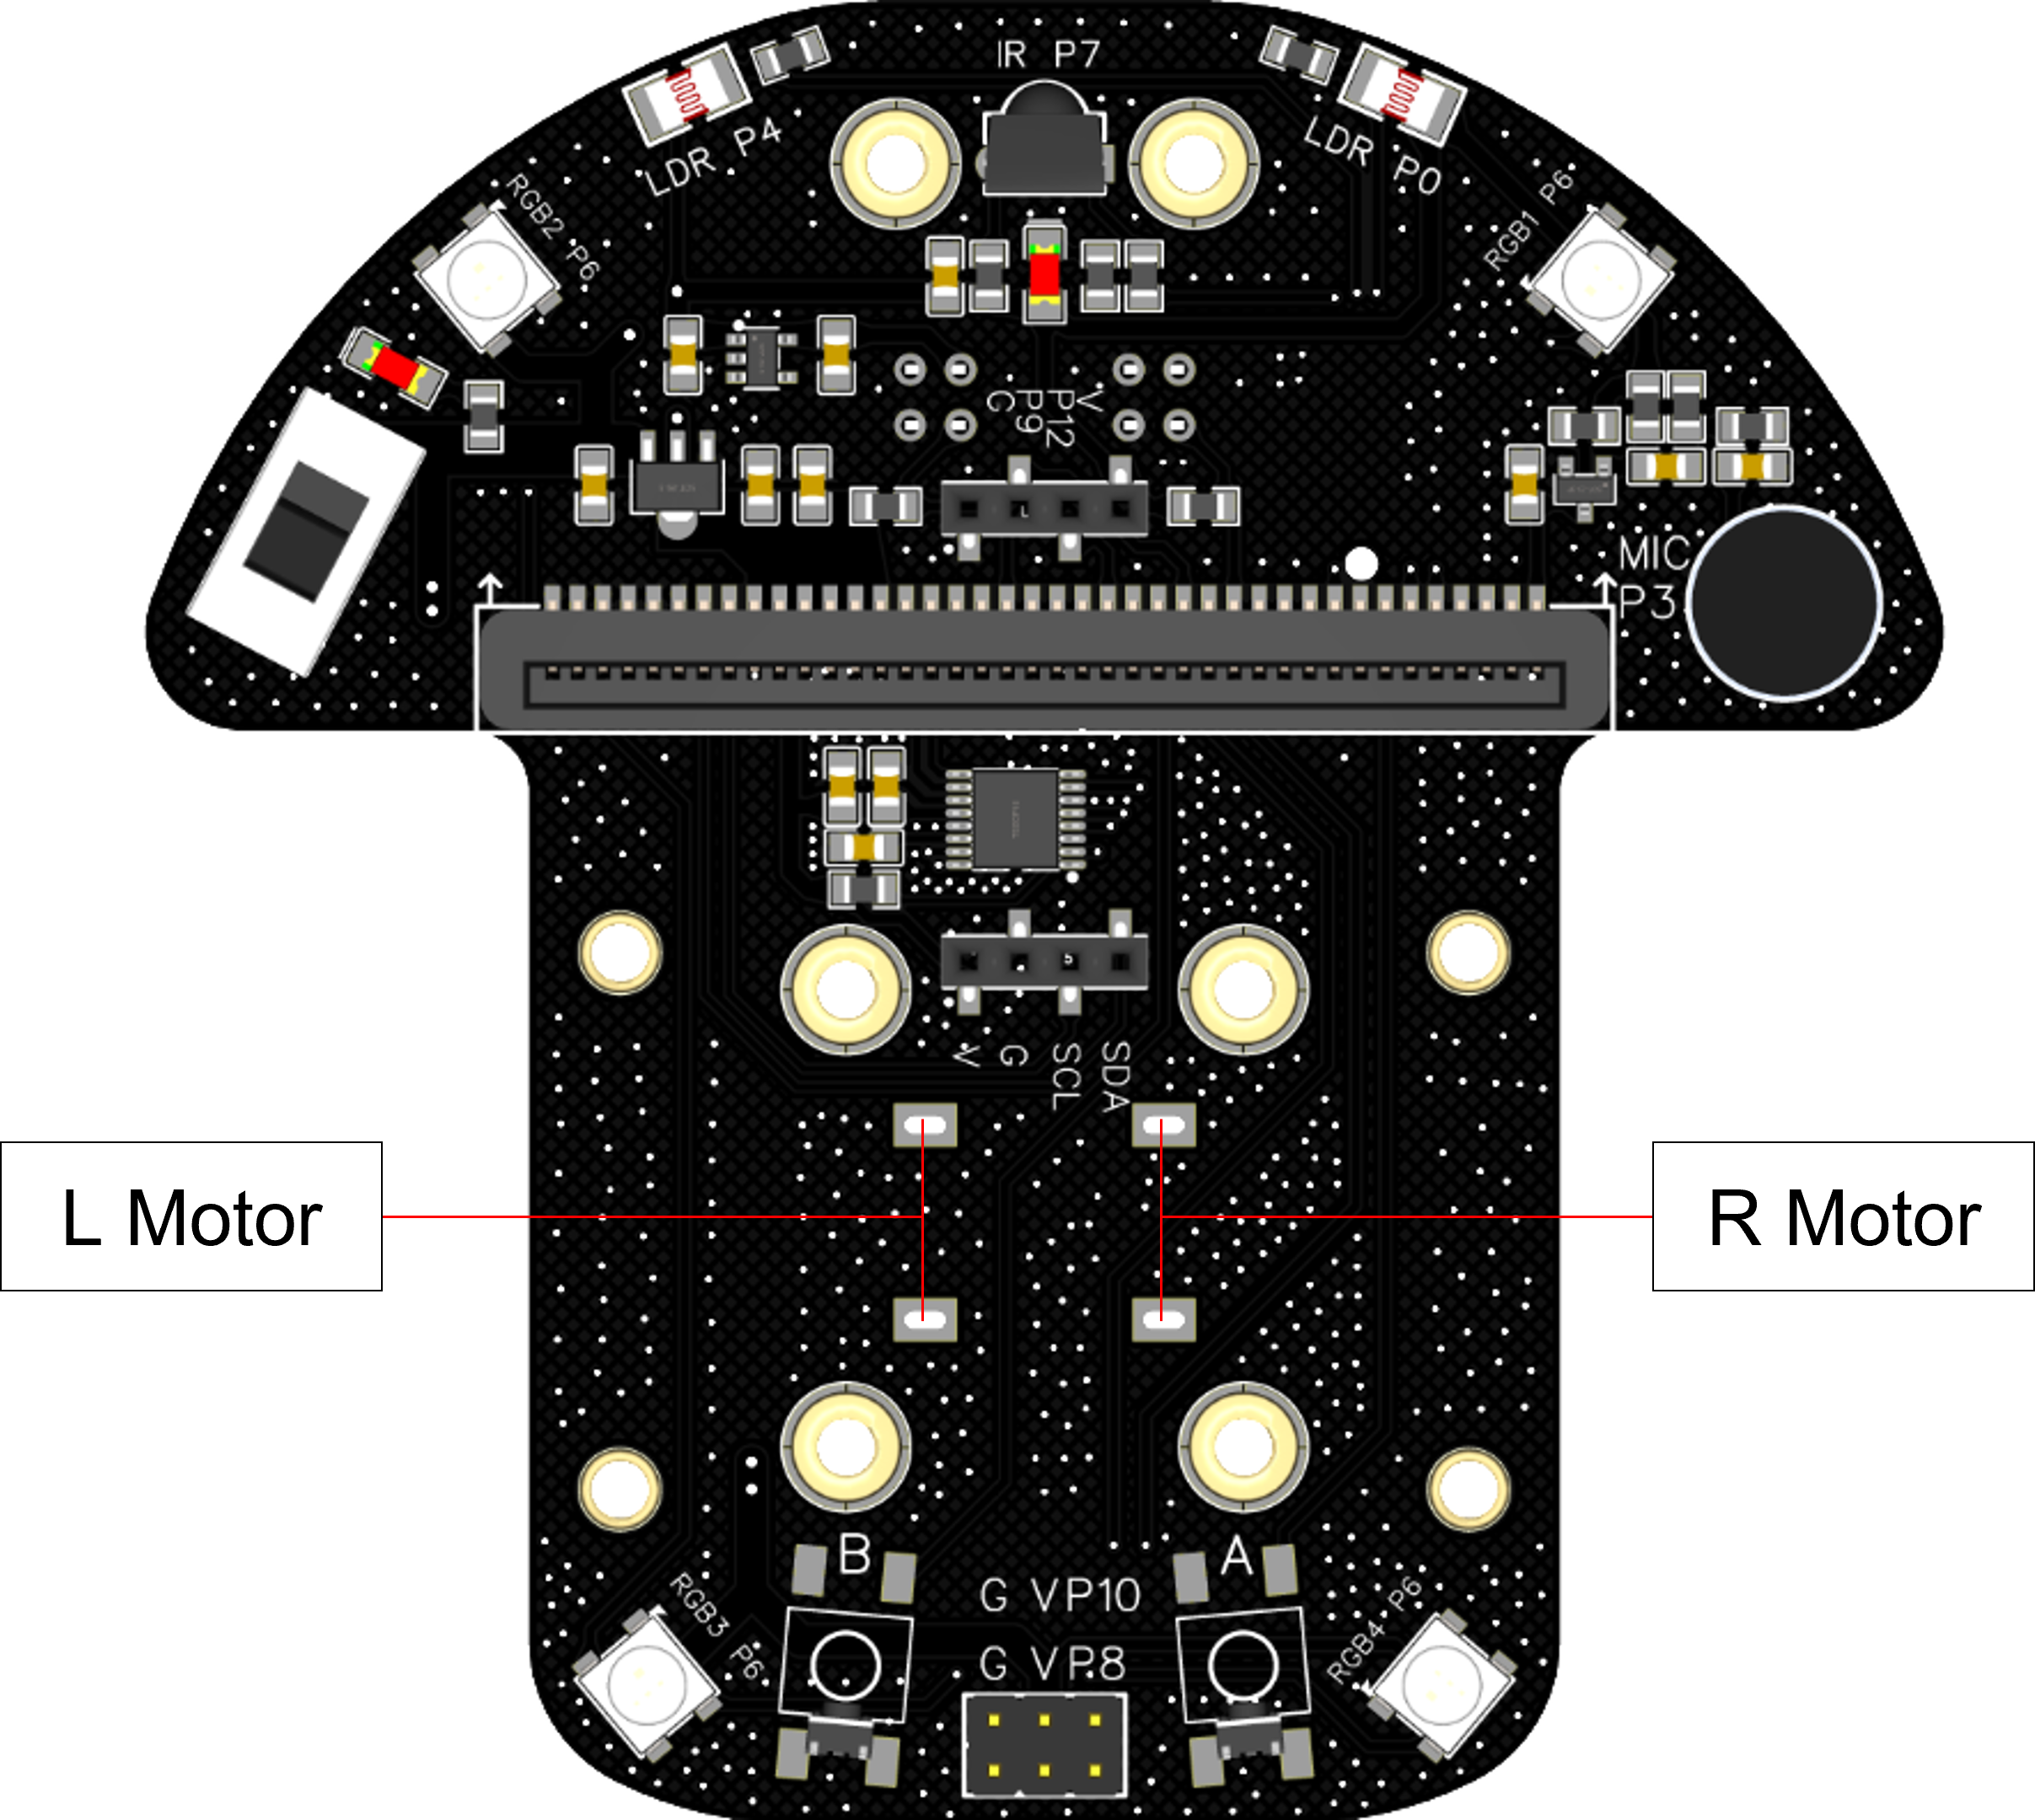
DeskPi MicroCar integrates dual DC gearmotors with PWM directional speed control:
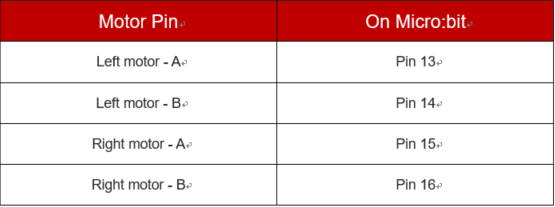
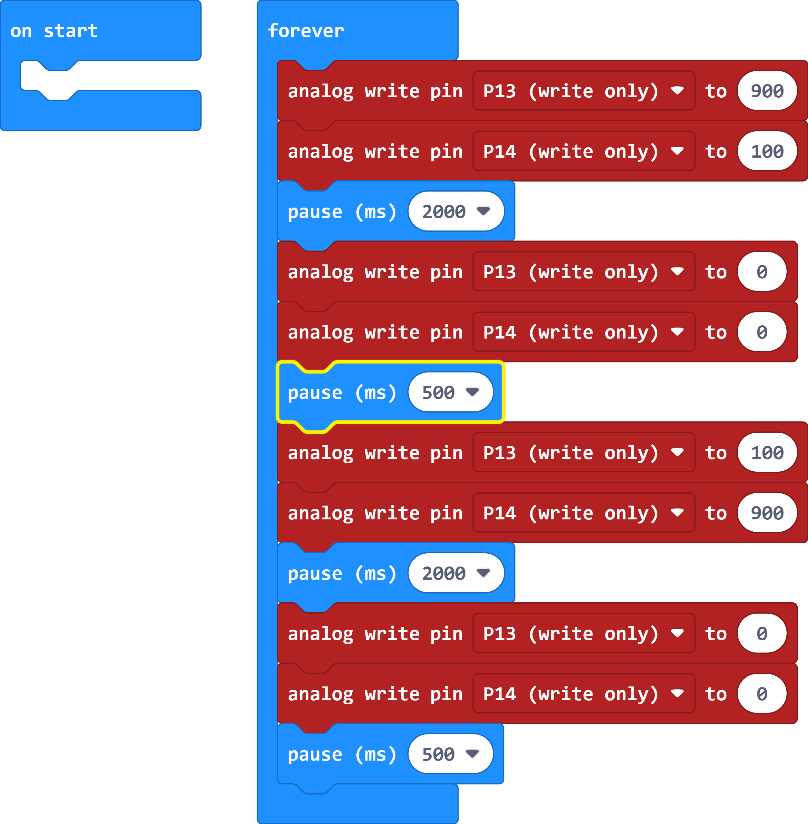
Vary the PWM differential between Pin13 and Pin14 to adjust vehicle speed and turning direction:
Interesting integrated application
Obstacle Avoidance Car
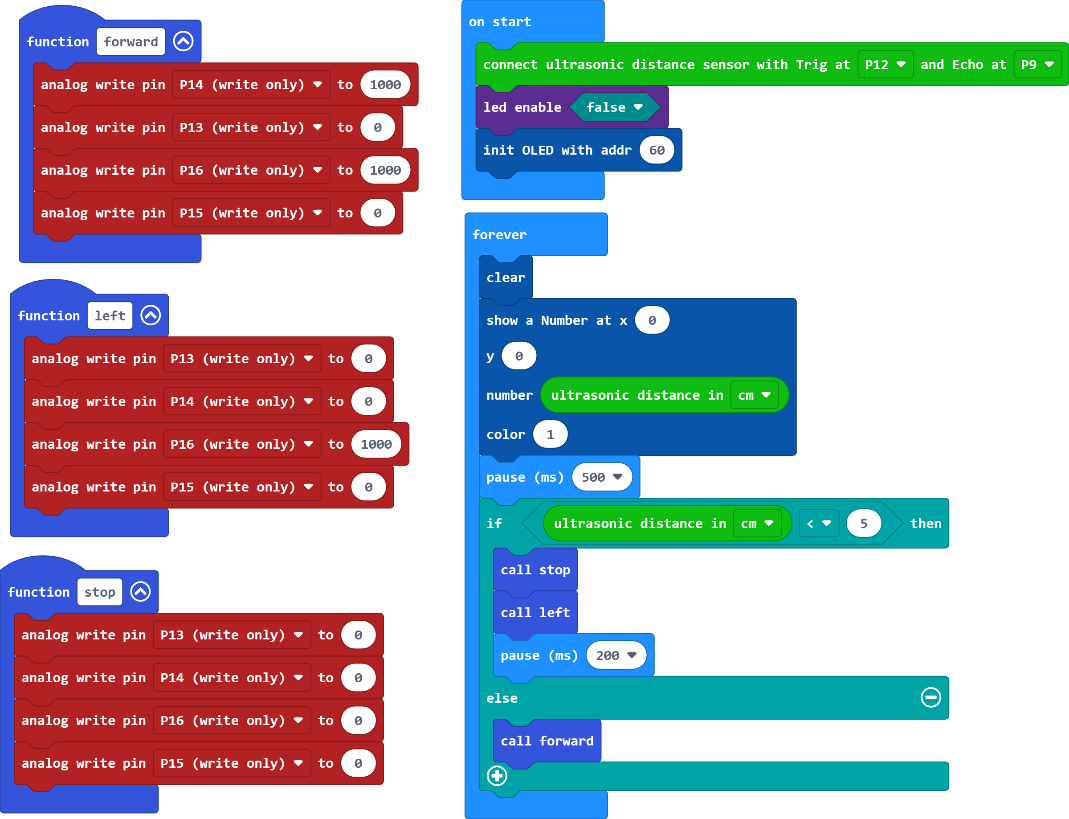
We can use ultrasonic to make a car that can automatically avoid obstacles, when there is no obstacle in front, the car moves forward, when there is an obstacle at a certain distance in front, the car decelerates, and when the obstacle distance is particularly close, the car settles down and rotates to the left/right for a certain distance and repeats the detection.
Light-catching Car
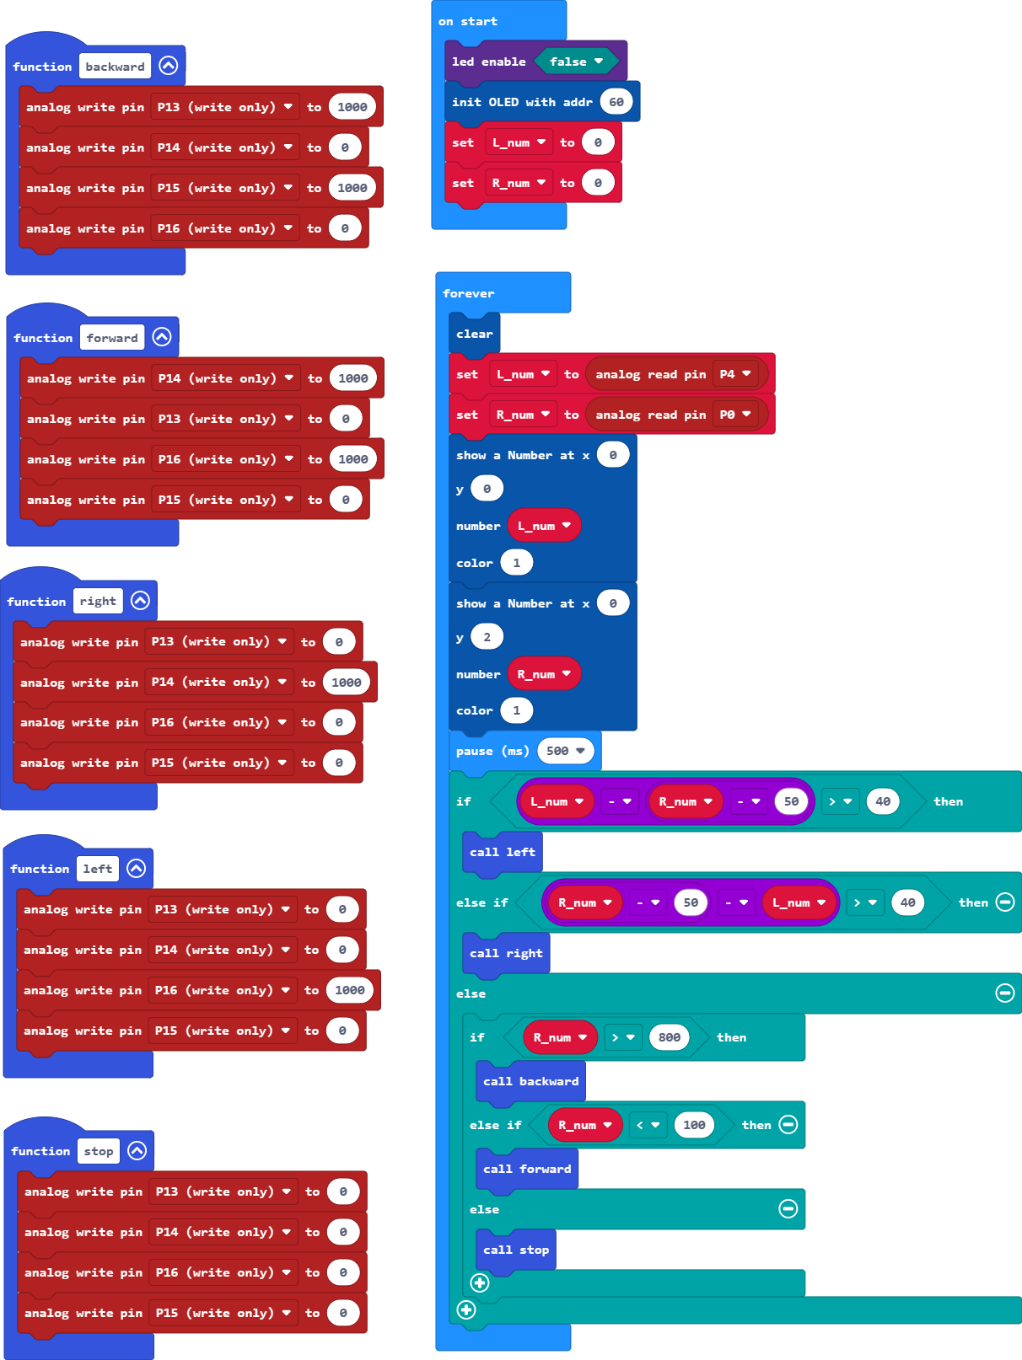
There two Optical Sensors on the Deskpi MicroCar, we can use that to control movement of the car. If the left optical readouts is larger than the right’s, the car turn left. If the both are small than a number, the car move forward. If the both are larger than a number, the car move backward.
Note: We need to get the different readouts of the two opticals in the normal lights, in this example, the left readout is 50 and the right one is 100.
Remote Control Car
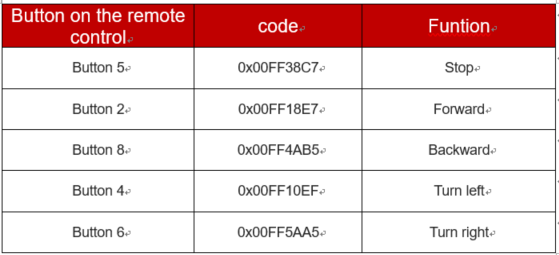
DeskPi MicroCar has a remote control, and it can be used to control the car’s moving! we choose several buttons to control the car. Button on the remote control code Funtion:
Line follower Car
DeskPi MicroCar’s two grayscale Sensors makes it can follow a line to run, the readouts on dark areas is smaller than light areas. If the two sensors’s readout are all very large, that means they are on the line, the car move forward, if the left’s readout is smaller, that means the car need to move rigth, otherwise move left.
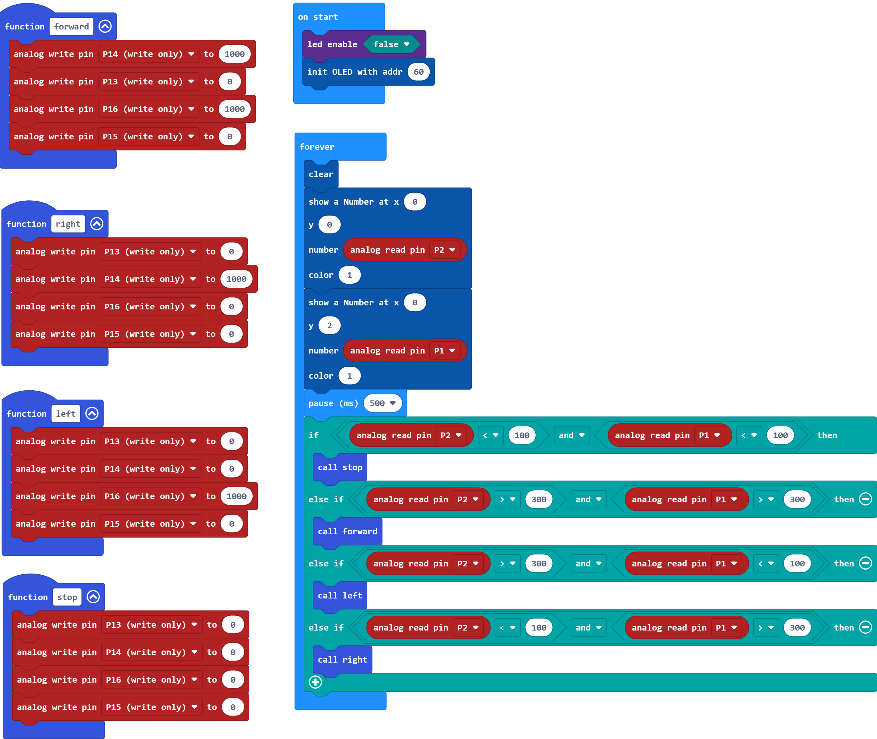
We can use dark-colored tape on the light-colored smooth ground or tabletop to stick out a track and run the car on it, it should be noted that the width of the tape should be between 2.5cm-3cm, and the track's can't have right-angled bends, and the bends should have a certain curvature.
Concluding Remarks
Congratulations on completing the learning of the DeskPi MicroCar, this manul gives the basic application examples and simple combination of applications, you can again based on the development of more and more interesting gameplay, such as adding sound and light effects, adding speed changes, etc., enjoy the design!